Contents
- 1 Add New Vehicle
- 2 Change vehicle | Add / edit vehicle
- 3 Start touring (GPS logging)
- 4 Modify / Add / Delete event
- 5 Modify Route / Road information
- 6 Delete driving / riding route | Re-get road name
- 7 Touring summary view
- 8 Sharing touring information
- 9 Main view
- 10 TOURING LOG
- 11 FUEL ECONOMY
- 12 MAINTENANCE
- 13 EXPENSE
- 14 PHOTOS
- 15 VEHICLE INFO / SERVICE DATA
- 16 FAVORITE ROAD
- 17 FAVORITE TOURING
- 18 Import touring (GPX file import)
- 19 APP SETTINGS
Add New Vehicle
At first when you start ROADSTOCK, vehicle registration dialog will be shown. You need to choose car or motorcycle on this dialog.

The registration form of a car or motorcycle opens. You cannot cancel this screen.
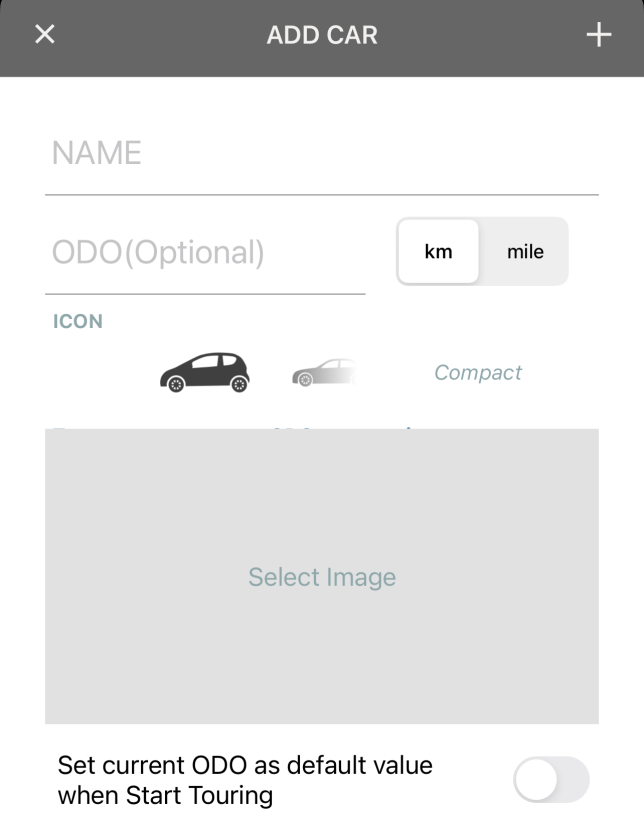
At least you need to input the name. ROADSTOCK manage any information related to each vehicle, so you need to regist vehicle first.
You can leave odo empty, but if you put odo for touring, fuel or any other event, this field will be filled. And you should select unit of the speed meter of your vehicle.
Then choose icon of your vehicle by swiping the image left and right. This icon will be used as vehicle position icon when you are on touring.
You should put photo of your vehicle. If you do not put it, default image will be used. This image is used as top image of main screen.
Then you should tap “+” on upper right of the screen. Your vehicle will be registered. Main view will be appeared.
Change vehicle | Add / edit vehicle
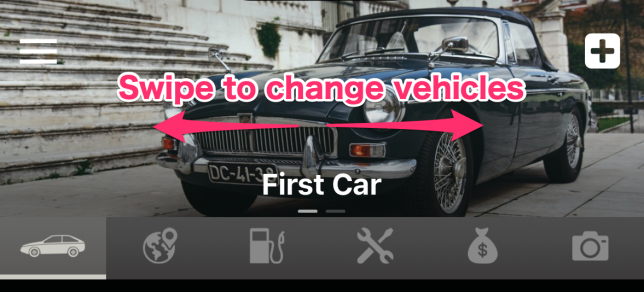
When you register a vehicle, the main screen will be displayed. If you have multiple vehicles, you can switch vehicles by swiping the image at the top.
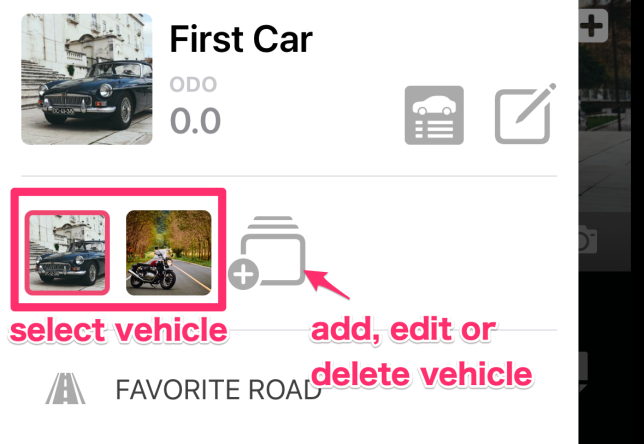
From the menu in the upper left corner of the main screen, you can switch vehicles, view favorite roads/touring, display the settings screen, etc. You can switch between vehicles by selecting the vehicle image. You can add vehicles (basically up to 5 vehicles, but you can add more by subscription), delete vehicles, and change vehicles. You can also add, delete, and reorder vehicles from this menu.
Start touring (GPS logging)
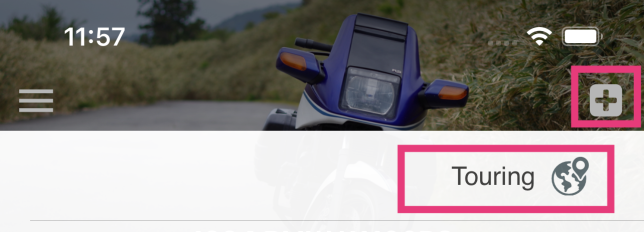
Before start touring, you should confirm current vehicle is correct. After that, tap the “+” button on upper right of main screen. Pull down menu will be appeared, choose “Touring”.
On the start touring dialog, you can input name of this touring and ODO. You can change these value later.
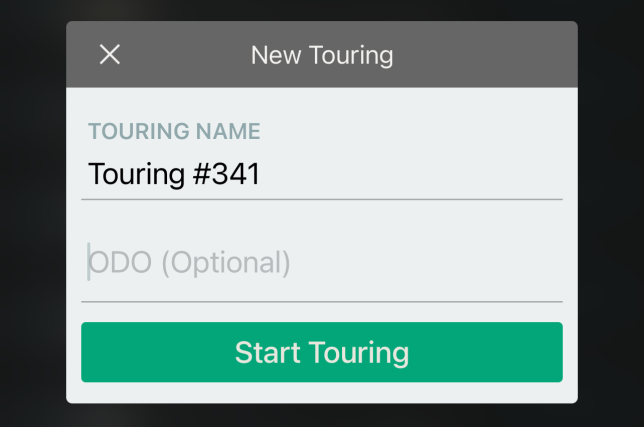
Tap the “Start Touring” button on this dialog, GPS logging starts, and Touring View will open.
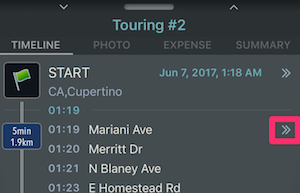
There are the map and timeline list on the Touring View. You can change map / timeline area by swiping the bar between map and timeline list. There is a “START” event on the timeline list. After you start driving or riding, logging will start.
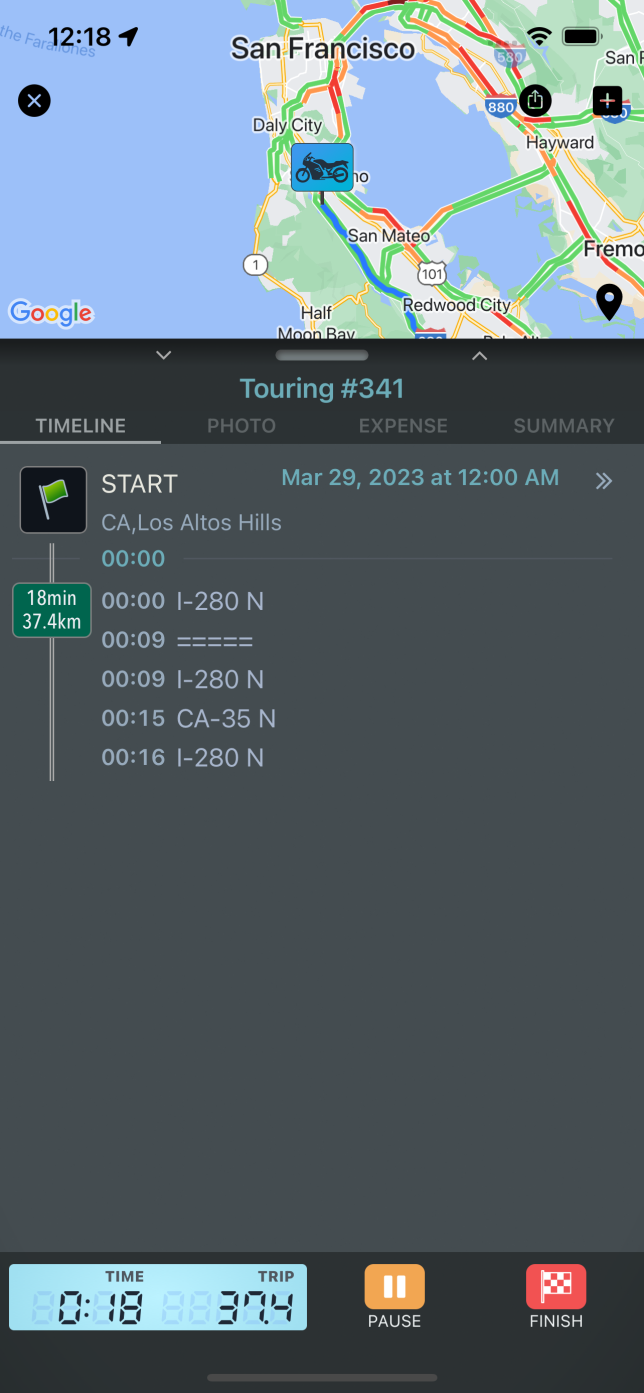
Driving / Riding event will be added to timeline list. If obtaining of road name succeed, the name will be added to driving / riding event. If failed to obtain, “=====” will be added instead of the road name. Trip distance and time will be updated.
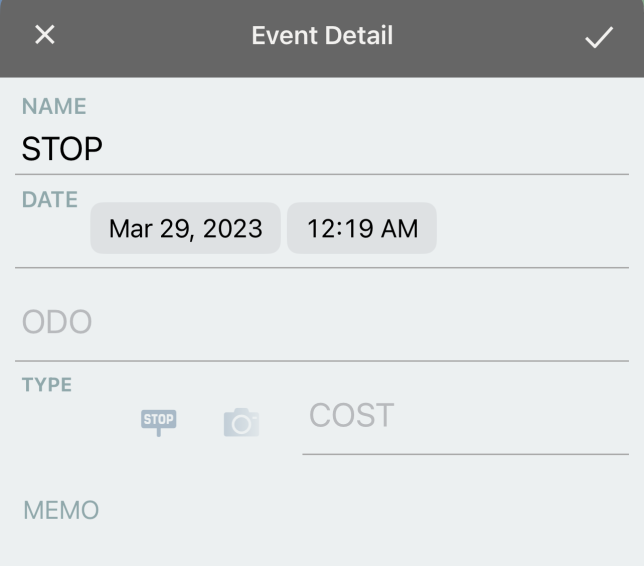
If you stop several minutes after driving / riding (3 minutes by default), the “STOP” event will be added to timeline list and light-green marker shown on the map automatically. You can change the name of this event, icon. And you can add photo, memo and the name of the place. To change them, tap marker icon on the map, or tap >> button at the right of timeline list. Event modify view will open.

You can change the name of event, icon. Also you can add ODO, cost, photo, memo and name of the place.
Contents of event modify view differ by event type. If this event is fueling, there are fuel specific field on the view like amount, price, unit price.
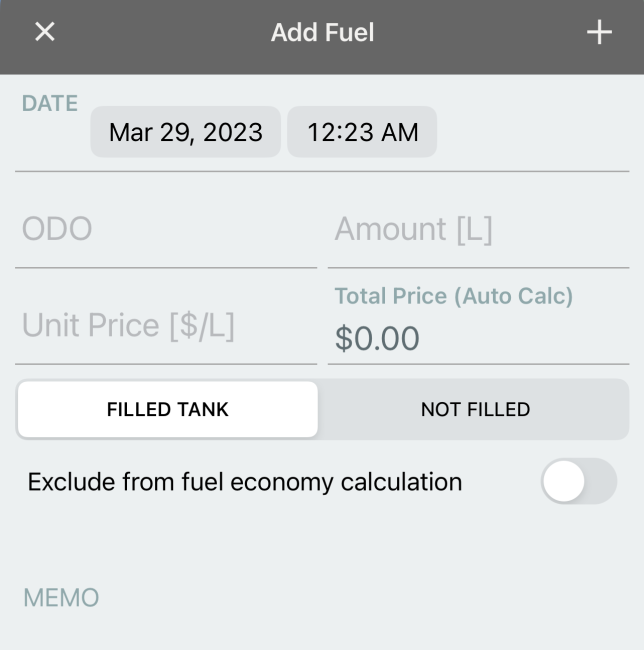
Event will be added automatically. And you can add event manually by using “+” button menu on the upper right of Touring View. There are photo, fuel, maintenance, expense menu item in this menu. You can add event when the touring is ongoing. After the touring finished, you can add event by long-tapping on the map.
Expense event is special. You can add this event after the touring finished. This event is not appear on timeline list but appear on EXPENSE tab on the Touring View.
To end touring, tap the FINISH button at the bottom of the screen. Enter the odometer distance (can be omitted) and press FINISH to finish touring. The ★ on the right side of the odometer means that this is your favorite touring. Tap it if you like this touring.
If you want to pause for battery saving or other purposes instead of exiting, tap PAUSE button. Remember to tap RESUME when returning from a pause. This is because the logging auto-resume function is also disabled when paused.
Modify / Add / Delete event
When “STOP” event has been added without expecting it, you can delete it. Long-tap the event which you want to delete for a few seconds on the timeline list, then an action menu will be displayed. Tap delete button from the action menu. If there are driving / riding event before and after the event, they are combined into one driving / riding event.
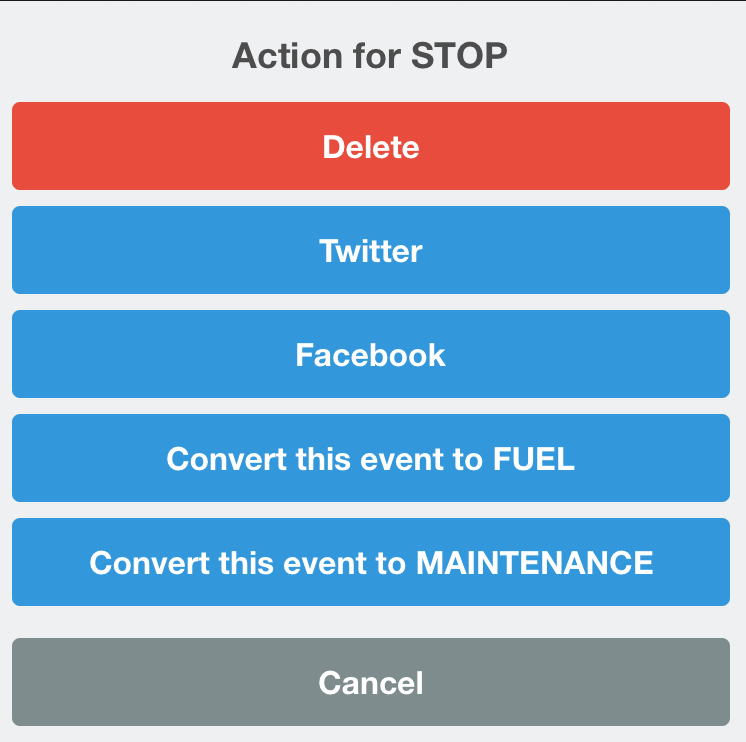
On this action menu, you can change event type from General event to Fuel event or Maintenance event. Also you can share the vent on this menu.
On the contrary, there is no “STOP” event which you expected, you can add new event manually. Long-tap on the route of the map, then a menu will be displayed. Event can be added only on the route. Because new event will divide the GPS log into two route.

Modify Route / Road information
Probably the road information obtained automatically should be incorrect. Such as not being able to acquire a road name, and being wrong, and end / starting place slipping off a road. In this case, tap >> button on the right of driving / riding event. Route editor view will be shown.
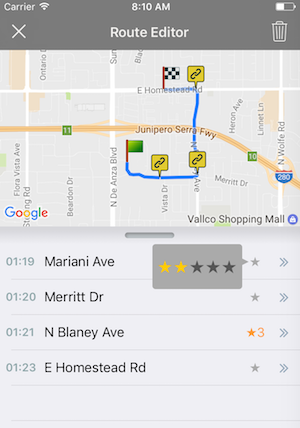
You can change rate of the road tapping ★ on the list, then the road recorded as your Favorite Road. This road will be shown in the Favorite Road view in the Main Menu.
If you want to change road name, tap >> on the right of the list. Road Information view is shown and then change any information of the road. You can add photo of this road in Road Information view.
You can change the point which the road changed. Also you can divide one road to two, or you can combine two road into one. If you want to divide, long-tap the route on the map. You want to combine, tap yellow marker icon on the map.
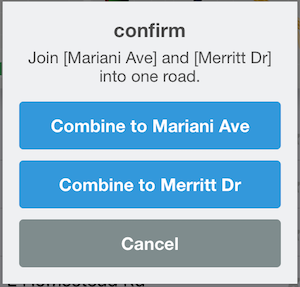
If you want to move the point where the road changed, at first, divide a road, secondly, combine.
Delete driving / riding route | Re-get road name
Long-tap driving / riding on timeline view, action menu will be shown. You can delete the route from the menu. Deleting action can not undo.
You can re-get road name from this action menu. This function is intended to use for imported touring. It will takes long time and can not work in background.
Touring summary view
Summary view available at the right end of touring view tab. In this view, you can change touring name, ODO , date and time. Fuel economy calculated only if there are two or more fuel event in the touring.
Sharing touring information
Touring informations can be shared via share menu on the right of the touring view.
![]()
- GPX log can be sent to another app or mail as GPX formatted file.
- Capturing map as image file and they can be shared to Twitter / Facebook. Before sharing, show the area on the map what you want to share.
- Timeline also can be shared as image / text.
- Summary information can be shared via mail.
- Copy timeline information as text.
Main view
Get back to the main view if you close touring view / stop touring. Main view is a tabbed view. You can change content view by selecting tab or swipe the screen. Main view’s contents are,
- Touring logs
- Fuel records
- Maintenance records
- Expense list
- Photos (related to the selected vehicle)
- Vehicle information and service data
There is “+” button on upper right of main view. This button add any information to the currently selected vehicle. This button’s functions does not depends on selected tab. You can add touring, fuel, maintenance and photo via this button. Also you can import GPX file as touring.
TOURING LOG
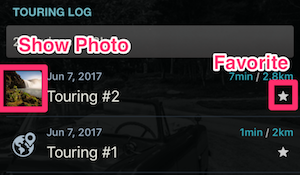
- List touring logs sorted by date (descending)
- If there are any photo in the touring, first photo shown as icon of the touring. If the icon available, you can open photo view from the icon.
- Show touring view if you tap touring name
- Tapping star ★ on the right of the touring, mark this touring as FAVORITE TOURING. If the touring is marked, this touring will be listed in the Favorite Touring View in the main menu
- You can delete the touring by long-tap on the touring. It will remove all of the information of the touring, including photos, any events
FUEL ECONOMY
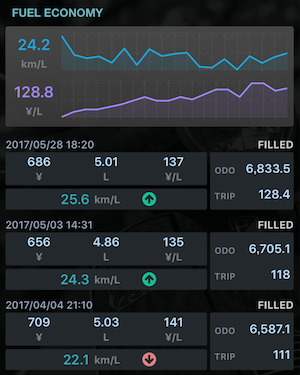
- List fuel logs in the view
- Graph will be shown in the case if there are three or more fuel entry including fuel economy information
- If you did not filled fuel, calculation will be postponed until you fill the fuel
- Tapping fuel information will open detail view. You can change values
- Green, upper arrow means fuel efficiency improved. Red, down arrow means fuel economy has been reduced
- Show action menu by long-tap each item. You can delete the entry via this menu
MAINTENANCE
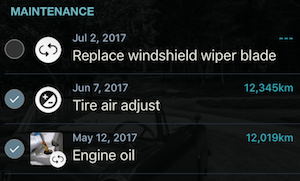
- List maintenance records
- Tapping maintenance will open detail view. You can change values
- Left check mark means ToDo / Done. By default, this is unchecked (todo).
- Photo icon shown at the left if there are any photo in the event. If the icon shown, tap this will open photo view
- Show action menu by long-tap each item. You can delete , duplicate and share the entry via this menu
EXPENSE
- List expense data
- Tapping maintenance will open detail view. You can change values
- Show action menu by long-tap each item. You can delete , duplicate and share the entry via this menu
- This expense menu intended to record cost of the selected vehicle itself, for example, insurance or tax. Expense for the touring is not shown in the list
PHOTOS
- List all photos for the currently selected vehicle including any events, touring
- Tapping photo will open image viewer
- Show action menu by long-tap each item. You can share the photo via this menu
- You can not delete photo in this menu
VEHICLE INFO / SERVICE DATA
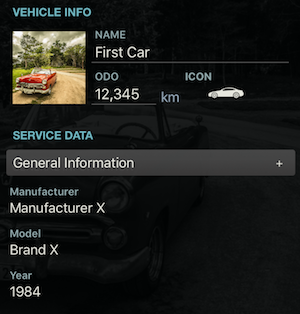
- You can edit the vehicle’s information or change image
- Service data section intended to keep the vehicle’s service information, like tire air pressure, tightening torque, amount of the oil, and so on
- “Edit Service Data” button will show action menu. You can add new category or you can import sample data. This sample data is just a sample.
- After addition item or imported sample, tapping “Edit Service Data” shows another menu. You can delete, modify informations from this button
FAVORITE ROAD

- Show this list from main menu on the upper-left of main view
- List your favorite road sorted by rate which you marked ★ in the Route Editor of each touring view
- This view includes all vehicle’s touring
- Tapping the road name, then move map to the road
- Tap the road on the map, then move favorite road list to the road
- Tapping >> on the right of the list, open the touring view which this road belongs to
FAVORITE TOURING
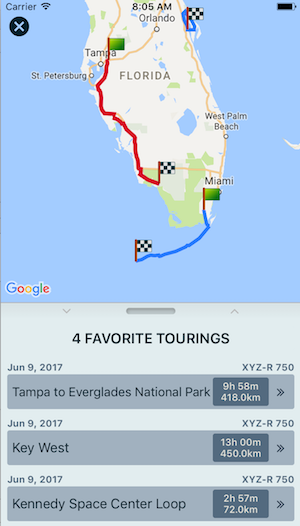
- Show this list from main menu on the upper-left of main view
- List your favorite touring sorted by date which you marked ★ in the touring view
- This view includes all vehicle’s touring
- Tapping the touring name, then move map to the touring
- Tap the route on the map, then move list to the touring
- Tapping >> on the right of the list, open the touring view which this road belongs to
Import touring (GPX file import)
You can import GPX formatted GPS log file into this app. If there is date and time information in the GPX file, import the log with considering stop and insert event automatically.
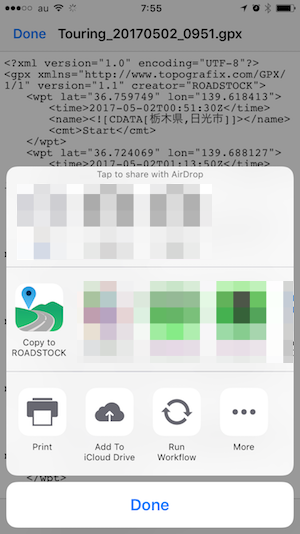
If you want to import, select GPX file in the mail app, Safari, or any other GPS app which can handle GPX file. For example, using mail app, you should send GPX file attached mail from Mac or any other device before import. After you receive the mail, download attached GPX and then choose “copy to ROADSTOCK”. After that, the GPX file has sent to ROADSTOCK
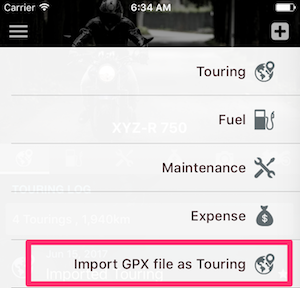
Now you can import GPX in ROADSTOCK. At first, you should choose suitable vehicle. Secondly, choose “+” button on main view and select “Import GPX file as Touring” menu.
GPX file selection dialog will appear. If there is no file available for import, this dialog will not shown.
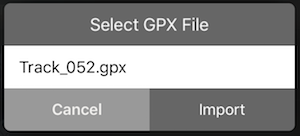
Tap “Import” to start import process. It will take several seconds. New touring will be added to the TOURING LOG view after the importing finished. If there are the name and time stamp in the GPX file, import process consider them.
Opening the touring, you will see the touring log which all the road name is “ON THE ROAD”. You can change the road name by using Route Editor view or “Re-Get road name” function by long-tapping the route.
APP SETTINGS
Settings menu available in the main menu.
Touring Logging Settings
- Show traffic while logging : Show traffic information
to the map. This setting valid during under GPS logging going on. - Always display ON while logging : Disable screen lock while GPS logging. This setting valid during under GPS logging going on.
- Road/Street name auto logging : Obtain road name while logging. Use location information and access to web service to obtain
the road name information. If disable this function, used “ON THE ROAD” as name of the road. You can edit it after the touring is finished. - No name road label : If obtaining road name
failed, set this string as road name. Use “=====” by default. This will often shown by any reason. For example, connection failure, you drove / rode on the road anywhere the web service does not have road name information. You can edit the name after the touring is finished. - Auto stop [min] : Minutes to add “STOP” event addition.
Format / Unit
- Fuel unit : Select the unit for fuel
- Fuel economy unit : Select the unit for fuel consumption
- Currency symbol : Input unit character
Main View
- Background blur : Vehicle’s photo is used as background
image. You can choose blur for the image. - Background alpha : Set transparency for the photo. 0 means black background.