Contents
- 1 Getting Started
- 2 Interface
- 3 Workout management
- 4 Swim Meet management
- 5 Calendar
- 6 Statistics
- 7 Where am I?
- 8 Multiple Swimmer / Team management
- 9 APP Settings reference
- 9.1 APP Settings : Tab Style
- 9.2 APP Settings : Multiple Swimmer / Team mode [default : OFF]
- 9.3 Workout Settings : Set name of each workout [default : ON]
- 9.4 Workout Settings : Default pool unit [default : meter (m)]
- 9.5 Workout Settings : Use both meter and yard [default : OFF]
- 9.6 Workout Settings : Weight Unit [default : kg]
- 9.7 Workout Settings : Label of “Rest” [default : Rest]
- 9.8 Workout Settings : Show additional info [default : OFF]
- 9.9 Workout Settings : Show photo in list view [default : OFF]
- 9.10 Workout List Item Settings : Style List
- 9.11 Workout List Item Settings : Distance List
- 9.12 Workout List Item Settings : Template List
- 9.13 Workout / User Data Settings
- 9.14 Swim Meet Settings : Show additional info [default : OFF}
- 9.15 Swim Meet Settings : Show swim meet type in list view [default : OFF}
- 9.16 Swim Meet Settings : Show photo in list view [default : OFF]
- 9.17 Swim Meet / User Data Settings
- 9.18 Swim Meet / Detail / User Data Settings
- 9.19 Statistics Settings : Show workout counter [default : ON]
- 9.20 Statistics Settings : Show workout chart [default : ON]
- 9.21 Statistics Settings : Show weight chart [default : ON]
- 9.22 Statistics Settings : Show best time chart [default : ON]
- 9.23 Where am I? Settings : Route List (Add / Delete / Re-order)
- 9.24 Sharing Settings : Twitter
- 9.25 Sharing Settings : Mail / Clipboard
- 9.26 Export to CSV
- 10 APP Update Information
Getting Started
First screen
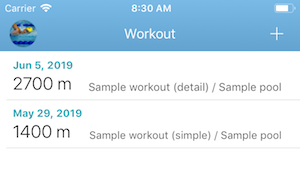
When you start Swim Note for the first time, the workout tab is open and two sample workout record is registered.
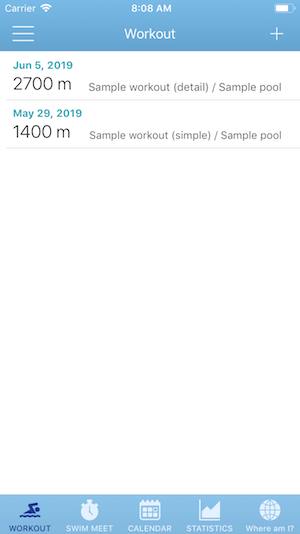
For now, just tap on one to see the contents. To use the swim meet management only, select the swim meet tab and tap the sample record to see it.
There are also tabs “Calendar” “Statistics” “Where am I?”. It doesn’t make sense for all of them to have a certain amount of records, so they can be forgotten for the time being.
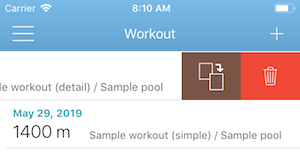
These data are just samples. Please delete it when it becomes unnecessary. Swipe left on the list and tap the trash can icon. And please register your own record.
To add a record, please add from the “+” button on the upper right of the screen. The workout record and the swim meet record are the same operations.
Workout
There are three ways to register training records: detailed mode to record details of contents, simple mode to record only total distance, and mode to record the length of the pool and the number of round trips (calculate the total from there). These modes are switched by the pull-down at the top of the screen. Generally I think that it is sufficient if there is a detailed mode or a simple mode, but I made it because only one person strongly requested the third mode.

First of all, I will explain how to use the detail mode. In this mode, total distance and total time can not be entered manually. Since the ▼ on the right of the place displays the place you entered in the list, please be aware that nothing will appear if there is no record. Tap “Add item” in the menu details to open the menu item screen.
Enter the practice menu one by one on this screen. Usually I think that it is interval training (for example, 50 m, 10 times one minute, and so on), so enter swimming style, distance, number and interval time. If you want to set more than one, enter the number of sets and the interval between sets. Enter and save a note if necessary. There are two save icons in the upper right, and the left side saves and closes the screen. The right side is saved, the screen is not closed, and you can enter the next one.
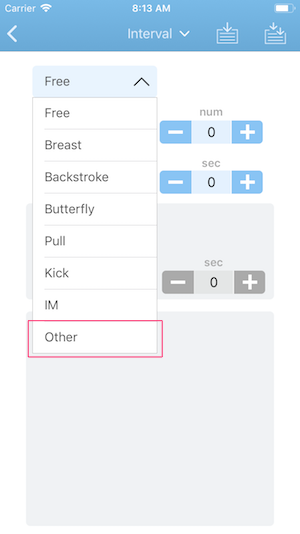
If you do not like or want to add a default registered style, add it from “Other” at the bottom of the pull-down, or add it from the “Style List” on the application settings screen. If the distance list is ad hoc, enter it manually, and add the one you use over time from the setting screen.
In addition to interval training, this screen allows you to record breaks and time trials (rather than intervals, if you just measure and leave time). These are switched by the pull-down at the top of the screen.
Close this screen to return to the workout record registration screen. Adding details will automatically calculate and set the time and distance and display a pie chart. If you want to leave photos, weights, notes, etc., please add on this screen. Note that the record will not be registered unless you press the “+” button on the upper right of the screen.
Swim meet
In the edit screen, first enter the name of the event, the location, and enter the classification (short water channel / long water channel / OWS). If the classification is different, be careful because the best time tabulation will be treated separately.
Then, tap “ADD RESULT” to enter the record registration screen.
In this screen, enter the event name, time, result, lap time, etc.
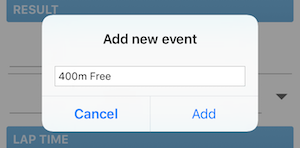
Events can not be manually input directly from here. A list will be displayed when you tap it, and only those with input results in the past will be displayed. If it is not here, please tap “Other (add new event)” and input from that screen.
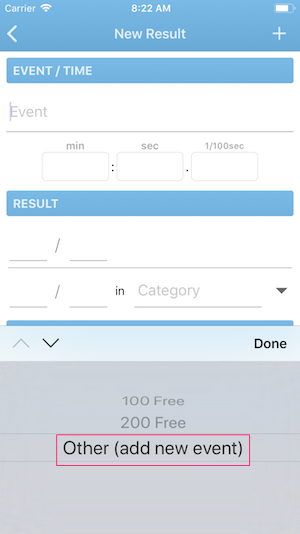
The time can be entered up to 1/100 seconds for short and long waterways, and up to 1/10 seconds for OWS. In the case of a short-course / long-course, there is only 1/10 record by manual measurement. In the case of the result like “1 minute 5 seconds 6”, please input “1 minute 5 seconds 60”. Please be aware that “1 minute 5 seconds 6” will be treated as “1 minute 5 seconds 06”.
The ranking can be entered in two ways, including overall ranking and category (for example, men in 30s).
Enter the lap time as required. The distance can only be entered manually. Please note that sorting after input is not possible.
Finally, register this type of recording with the “+” button on the upper right, close the screen and return to the previous screen.
If you participate in several events on this swim meet, please add more records.
Finally, save the event record with the “+” button on the upper right. Please note that the record will not be registered unless you press the “+” button at the top right of the screen.
Interface
Menu
Launch the menu from the button on the top left of the screen. Menu button display and contents change depending on whether or not multiple swimmer / team mode is enabled.
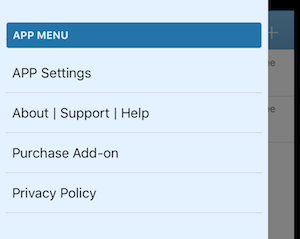
The following four menus are displayed in any mode.
- APP Settings : Open settings view
- About | Support | Help : Version information, link to support site, help page (this page)
- Purchase Add-on | Purchase an add-on to hide the ad and use the CSV export feature
- Privacy Policy
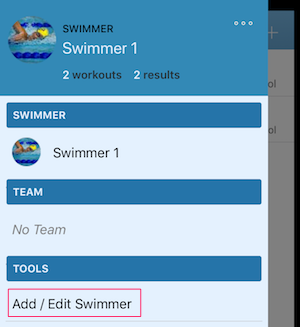
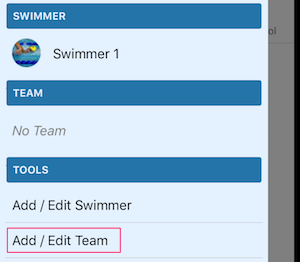
When Multiple Swimmer / Team mode is enabled, the menu button will be the swimmer or team icon. If you have not specified the image of the swimmer or the team will be the initials icon.
The menu contents also change. The top shows information about the currently selected swimmer or team, and a menu of swimmers and team selections is added below it.

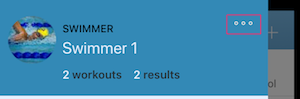
The registered swimmer is displayed in “SWIMMER”. You can switch the swimmer from here.
The same is true for “TEAM”. In addition, only one of SWIMMER and TEAM can be selected.
Below that are the TOOLS menu items:
- Add / Edit Swimmer : Lists registered swimmers. You can add / edit (rename / change images) / delete from here.
- Add / Edit Team : Lists registered teams. You can add / edit (rename / change images / edit members) / delete from here.
- Workout mapping tool : Reassign workout records registered for one swimmer or team to another. It is assumed to be used when migrating data from the older version.
- Swim meet mapping tool : Reassign a swim meet record registered for one swimmer or team to another swimmer or team. It is assumed to be used when migrating data from the older version.
Tabs
- Workout : Lists workout records. Display the graph at the top (requires 3 or more records)
- Swim meet : Record the time and result of the swim meet participation
- Calendar : View training and tournament records on a monthly calendar
- Statistics : Display workout records and best time statistics
- Where am I? : Display the cumulative workout distance on the map
![]()
Workout and Swim Meet records can be grouped together in the Activities tab. You can change the order or use only one of them. You can switch it by “Tab Style” on the APP Settings view.
Workout management
General
It is a function to manage daily workout records. If you enable “Multiple swimmer / team mode” and record as a team, there are some differences.
Training records can be added in the following three ways.
- “+” button on top right of Workout tab
- “+” button in the upper right of the Activity tab => Workout
- Select a date in the calendar tab and click the “+” button on the top right => Workout
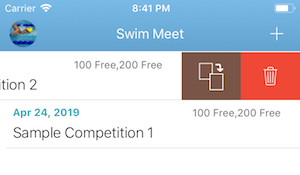
However, if you are already using Swim Note to some extent, it may be faster to “replicate” past records. You can swipe left the existing record and duplicate it with the brown button. The replicated data is basically the same as the replication source, and only the date is the operation date. Also, photos are not eligible for duplication.
This will open the workout record registration screen.
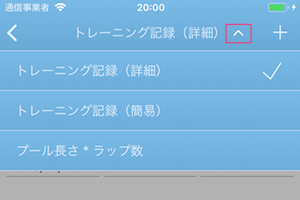
In this state, select the mode from the pull-down at the top of the screen. By default, the previously used mode is selected.
- New Workout | Detail : A mode to record the practice menu in detail
- New Workout | Simple : A mode to record only the total distance
- Pool length x Lap : A mode that records the length of the pool and the number of round trips, and calculates the total from it
Basically, once registered in any mode, it can not be changed afterward. Only one registered in the simple mode can be changed to another mode.
This screen is divided into several sections. First, enter the following in [GENERAL INFORMATION].
- NAME : Set the name. It may be blank. You can also hide this field itself in the APP Settings.
- DATE : The initial value is the current date. Please change accordingly.
- DISTANCE : Input is possible only in the simple mode. Calculated automatically in detail mode.
- TOTAL TIME : Automatic calculation results are displayed only in the detail mode.
- LOCATION : Please enter the pool name, beach name etc. The items entered in the past can be selected from the ▼ on the right.
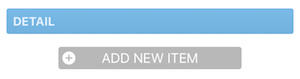
Add items from “ADD NEW ITEM” only in Detail mode. This will be explained later.
If necessary, please add a photo from “ADD PHOTO” in the [PHOTOS] section. You can add any number of photos. The added photo is copied and saved in the app. It will be managed separately from the “Photos” app of your device.
Please fill in the [ADDITIONAL INFORMATION] section as necessary. It may be all blank.
- Weight : If you enter it, you can display a graph with “Statistics” tab.
- MEMO : This is just a note.
- USER DATA 1 to 3: It is used when you want to save some fixed form information other than memo continuously. The item name can be changed from the APP Settings. It can also be displayed when the list is displayed.
There is a button at the bottom of the screen. There are three buttons in detail mode and one in other modes. The following functions are from the left of the screen.
- (Detailed mode only) Import from template
- (Detailed mode only) Save the current screen contents to a template
- Share the information to Twitter or Email / Clipboard
Workout detail
If you have selected the detail mode, you need to create workout details. If you do not have any details, an error will occur and you will not be able to save your workout record.
Tap [ADD NEW ITEM] to display the menu details registration screen.
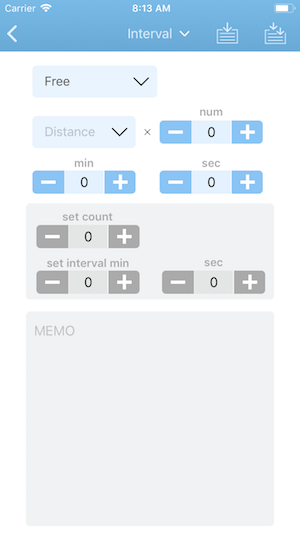
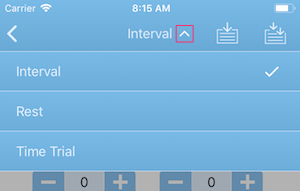
First, select an item from the pull-down on the top of the screen.
- Interval : Normally this would be selected
- Rest : Use when registering break time
- Time Trial : Use when you want to save accurate time
Aside from the interval, the application is limited because it is a little special.
The buttons on the right side of the pulldown have the following meanings from the left side.
- Save this item and close screen
- Save and add the next item without closing the screen
The details of interval training are as follows. The rest and time trial are similar, so I will omit the explanation.
- STYLE : Select from the pull down. If you can not find suitable item, select “Other” at the bottom and add it from the screen. Please delete the method of swimming and change the name on the APP Settings.
- DISTANCE : Select from the pull down. If there is nothing desirable, please enter it manually. If you want to add frequently used items to the pull-down, or delete items, please go to the APP Setting.
- num : Number (Please change with the + / – button or enter manually. The same applies below)
- min:Interval (minutes)
- sec:Interval (seconds)
If you want to set the same thing more than once, please register the following. It may be left blank except for the number of sets.
- set count : number of sets
- set interval min : Interval between sets (minutes)
- sec : Interval between sets (seconds)
Swim Meet management
General
It is a function to manage the swim meet participation results. If you enable “Multiple Swimmer / Team mode” and record as a team, there are some differences.
Swim meet records can be added in the following three ways.
- “+” button on top right of Swiom Meet tab
- “+” button in the upper right of the Activity tab => Swim Meet
- Select a date in the calendar tab and click the “+” button on the top right => Swim Meet
However, if you have already used it to a certain extent, and have participated in the same event each time, it would be faster to “reproduce” the past records. You can swipe left the existing record and duplicate it with the brown button. The replicated data is basically the same as the replication source, and only the date is the operation date. Also, photos are not eligible for duplication.
This will open the swim meet record registration screen.
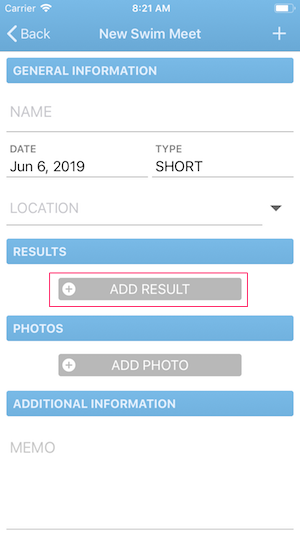
This screen is divided into several sections. First, enter the following in [GENERAL INFORMATION].
- NAME : Enter the swim meet name.
- DATE : The initial value is the current date. Please change accordingly.
- TYPE : Choose one from SHORT/LONG/OWS
- LOCATION : Please enter the pool name, beach name etc. The items entered in the past can be selected from the ▼ on the right.
Add items from “ADD RESULTS”. This will be explained later.
If necessary, please add a photo from “ADD PHOTO” in the [PHOTOS] section. You can add any number of photos. The added photo is copied and saved in the app. It will be managed separately from the “Photos” app of your device.
Please fill in the [ADDITIONAL INFORMATION] section as necessary. It may be all blank.
- MEMO : This is just a note.
- USER DATA 1 to 3: It is used when you want to save some fixed form information other than memo continuously. The item name can be changed from the APP Settings. It can also be displayed when the list is displayed.
Results
Save an individual race result for the swim meet. If you participated in multiple races in one swim meet, please register individual detail result. Tap [RESULTS] -> “ADD RESULTS” to display the New Result Registration screen.
This screen is divided into several sections. First, enter the following in [EVENT / TIME]. Only the Event is a required input.
- Event : Set the event name (for example, 100m Free). Please tap the field and a list will appear. If you do not have something desirable, select “Others (new item added)” at the bottom of the list and register from the screen that appears.
- hour : Hour (displayed only when the classification is OWS).
- min : minutes
- sec : seconds
- 1/100sec : Be sure to enter 2 digits. If 5 is entered, it will be treated as 05, so enter 50 if there are only 1/10 seconds of recording by manual timekeeping etc.
- 1/10sec : If the classification is OWS, it will be 1/10 second instead of 1/100 second.
Enter the result in the [RESULTS] section. The upper is the overall ranking, and the lower is the category ranking (for example, men in 30s). Please enter only what you need. Manually enter the “Category” or select from the list.
If necessary, add a lap time from “ADD LAP TIME” in the [LAP TIME] section. You can add any number of lap times, but you can not change the order after registration.
Please fill in the [ADDITIONAL INFORMATION] section as necessary. It may be all blank. Here are notes and additional data about this item.
- MEMO : This is just a note.
- USER DATA 1 to 3: It is used when you want to save some fixed form information other than memo continuously. The item name can be changed from the APP Settings. It can also be displayed when the list is displayed.
Calendar
It is a screen to browse past training records and tournament records on a calendar basis. Move the month with swipe up and down. Tap an item in the calendar to display the summary at the bottom of the screen. If you tap “…” at the right end, the detail screen of the record will appear.
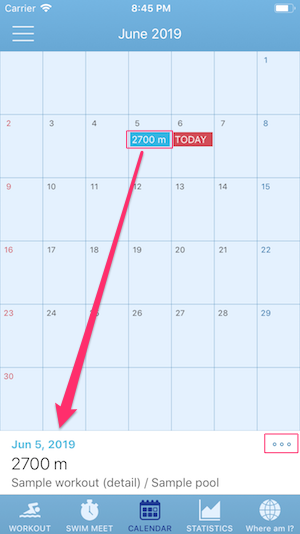
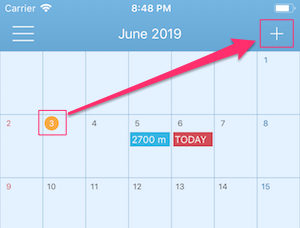
Instead of record, simply tapping a date cell will change the date of that cell to yellow. Then “+” button appears in the upper right of the screen. You can register a new item on this date by tapping this “+”.
Statistics
It is a tab that displays information collected based on registered training records and tournament records. There are four sections below. The display / non-display of each section can be switched in the APP Settings.
- WORKOUT COUNTER : Cumulative number of times, distance etc from past workout record
- WORKOUT CHART : Graph all distances, by month, year by year
- WEIGHT CHART : Display graph of weight change
- BEST TIME : Display the best type according to classification / item. Tap to view all records of the item
If there is no record, nothing is displayed. Training record transition and weight transition will not be displayed if the graph can not be displayed (if the number of records is lower than 3).
If you have selected a team in Multiple Swimmer / Team mode, the WEIGHT CHART and the BEST TIME section will not be displayed.
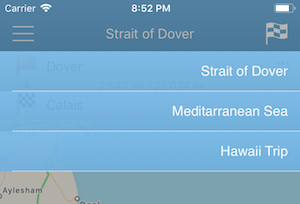
Where am I?
The mapping of the workout record is based on the assumption of swimming between two points on the map. The starting point is a red flag and the goal point is a checkered flag. There is a swimmer icon between them.
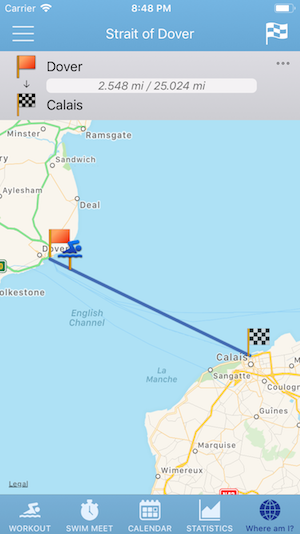
Three routes are registered by default. You can change it from the upper right flag button.
If you want to edit the route, you can change it from the “…” upper right button.
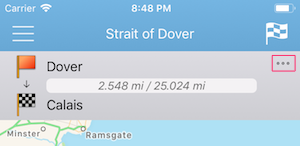
The following information can be changed on the “Edit Route” screen.
- Route Name
- Scope : You can select the workout record aggregation range
- Start and goal location name
- Start and goal coordinate (Long-tap on the map to indicate the location)
If you want to add a new route, please add from the “Route List (Add / Delete / Re-order)” of the APP Settings screen.
Multiple Swimmer / Team management
You can manage multiple swimmers (up to 5) by turning on “Multiple swimmer / team mode” toggle in the App settings.
In addition, you can manage multiple swimmers together as a team (up to 5 swimmers per team).
Overview
- Enable this mode to register multiple swimmers and manage their own record separately. You can also manage multiple swimmers together as a team.
- There is no point in using this feature if you only manage one swimmer’s records (it does not matter, but it has no benefit).
- If you do the same workout frequently or compete in the same swim meet, managing as a team will make data entry easier. If you just want to manage multiple swimmers (they do not anything together), here is no point in making it into a team, so it is better not to use it.
- Swimmers may or may not belong to a team.
- When this mode is enabled, the menu on the upper left of the screen becomes a swimmer or team icon, and all the following operations become operations (data display, registration, change, deletion) for the displayed swimmer / team. You can also make changes by selecting the swimmers / teams listed in this menu.
- If you disable the mode after registering multiple swimmers, the last selected swimmer will be selected.
Getting Started with Multiple Swimmer / Team Mode
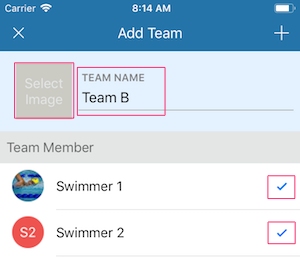
- If you have not set up a swimmer or team image, the icon will be assigned a random color. This color can not be selected. Setting image is recommend.
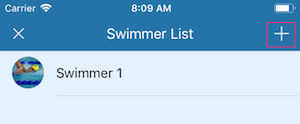
- Register as many swimmers as you need from the “Add / Edit Swimmer” menu. However, the current version is limited to 5 people.
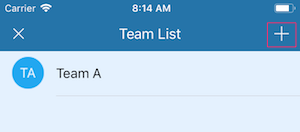
- If you manage by team, please display the team list screen from the “Add / Edit Team” menu, and add a team from the button on the upper right. At that time, select a swimmer that belongs to the team. The number of teams is also limited to five.
- When assigning past records to a swimmer or team, please assign using “Workout mapping tool” or “Swim meet mapping tool”. If you don’t look back or break up in the past, you don’t have to do anything.
Usage of data mapping tool
When you start the tool, all the records in the database are listed. When first launched, all data is assigned to Swimmer 1 (or the swimmer that renamed it). Assign this to other swimmer or team.
Tap the ○ on the left side of the item you want to change the assignment to select. If you want to select all data, please tap “select all” at the bottom of the screen.
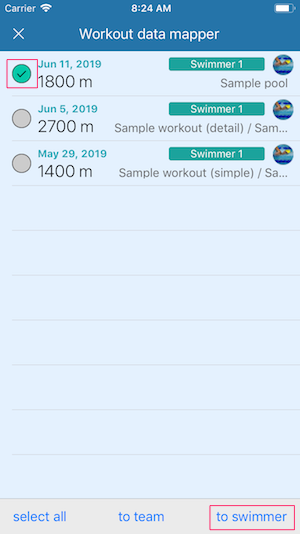
To assign to a swimmer, tap “to swimmer” at the bottom of the screen. Please tap “to team” to assign to a team.
Then, it will be a swimmer or team selection screen. Select the assignee and tap “Assign”.
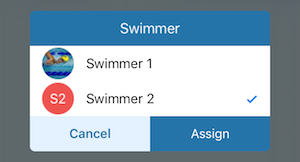
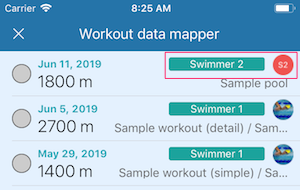
On the next confirmation dialog, tap “Assign” to execute. Assignment is complete when you return to the list screen.
Relationship between swimmers, teams and records
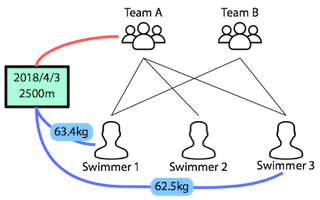
The data registered as a team record will also be a record of the swimmers belonging to the team. However, it is limited to the swimmers assigned to each record. Since every member of the team does not necessarily attend every workout or swim meet, so it is mandatory to assign a swimmer for each record.
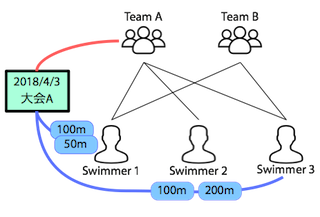
For example, if workout is registered as “Team A” data on 2018/4/3 and “Swimmer 1” and “Swimmer 3” of “Team A” members participate (“Swimmer 2” is absent), the data structure is as below It looks like. This workout refers to the same thing when viewed from “Team A” and when viewed from “Swimmer 1” and “Swimmer 3”. You can also view the data saved as “Team A” data from the “Swimmer 1” screen. Only the weight is kept as data between the record and the swimmer.
The swim meet’s record has the same structure, but each race’s record (time, order, etc.) is stored on an individual basis.
Swimmers can belong to multiple teams (belonging to or leaving a team). Even if the swimmer who participated in the training as a team left the team after that, what was once assigned remains as it is (it remains as a record at that time).
Limited features when selecting a team
Only when selecting a team, there is a function that works differently from normal use. For example:
- When registering for Workout, you need to select the swimmers to participate in the workout. All swimmers are selected by default, so please tap the non-participating swimmers in the displayed screen.
- When registering the weight of the training record, please tap and enter one by one on the open screen.
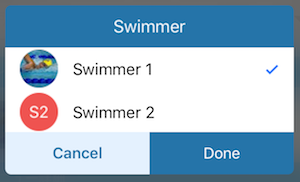
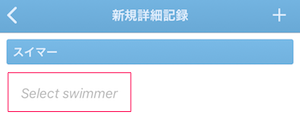
- Registration of event records in Swim Meet will be recorded data for each swimmer. At the top of the detail recording screen, the Select Swimmer instruction will be displayed. Tap there and select one of the swimmers.
- On the Statistics tab, weight and best time are not displayed (since there is no point in totaling by team unit).

Add / Edit / Delete Swimmers and Teams
- Please display the list from the “Add / Edit Swimmer” or “Add / Edit Team” menu, and add it from the “+” button on the upper right.
- To remove a swimmer, swipe left on the target swimmer on the swimmer list screen. However, swimmers that have some recorded data can not be deleted.
- The same is true for teams. You can not delete a team to which only one swimmer belongs.
- Assign a swimmer to the team. Please select in the “Team Member” list on the “Add / Edit Team” screen.
Other restrictions
- In the current version, you can register up to 5 swimmers and 5 teams.
- In the case of relay, there is no function to manage who went in which item / order, who time was, etc. There are no plans to respond in the future. This is because there are too many management elements to handle.
Background of this feature
It was developed because there were quite a lot of requests to manage data of multiple people. I myself do not use this feature at all and I do not think it is necessary for me. Since Swim Note is originally an application for individuals (iPhone owners), it was fundamentally reworked to handle multiple people’s data, but at the very least we are assuming it. We do not have development with a view to managing dozens of people, and there is no plan.
APP Settings reference
APP Settings : Tab Style
You can change the items displayed on the tab. The only things that can be changed are “Workout” and “Swim Meet”, and the others can not be changed.
- Activity Style : It combines training records and tournament records on one screen. Same as Ver.3.
- Workout + Swim Meet : Display each tab
- Swim Meet + Workout : It is what changed the order of the thing above
- Workout only : Only show Workout, Swim Meet will be hidden
- Swim Meet only : Only show Swim Meet, Workout records will be hidden
APP Settings : Multiple Swimmer / Team mode [default : OFF]
When the switch is ON, Multiple Swimmer / Team mode is enabled. Once enabled, increase the number of swimmers and teams, and then turn it off, back to the single swimmer mode (initial state) with the selected swimmer’s record is shown. All data remains.
Workout Settings : Set name of each workout [default : ON]
When the switch is on, you will be able to set your workout record name.
Workout Settings : Default pool unit [default : meter (m)]
It can be set because the unit of pool size is different depending on the country. The default value is determined based on the language setting of the iPhone, so for example, if you are in the United States and you use it in Japanese, it will automatically become meters.
Workout Settings : Use both meter and yard [default : OFF]
If you want to set the pool unit (meter or yard) each time, please set it to ON.
Workout Settings : Weight Unit [default : kg]
Set the weight unit as required
Workout Settings : Label of “Rest” [default : Rest]
If you add “Break Time” in the workout record detail entry screen, set the display name when listing the item. Please change to “Rest” “rest” etc, as you like.
Workout Settings : Show additional info [default : OFF]
Select whether to display the three “USER DATA” at the bottom of each workout record item registration screen in the workout list view. When ON, three additional user data are listed.
Workout Settings : Show photo in list view [default : OFF]
You can now register photos in workout records from Ver.4. Turn this on if you want to display this in list view. If you have a record without photos, the default image is displayed.
Workout List Item Settings : Style List
Add, delete or edit the selectable stroke items in the detailed mode of Workout. If you want to change the sort order, please long press → drag and drop. In addition, if it is only addition, it can add even from the pull-down lowermost part “others” of the usual workout record edit screen.
Workout List Item Settings : Distance List
Add, delete or edit the swim distance items selectable in the detail mode of Workout. If you want to change the sort order, please long press → drag and drop.
Workout List Item Settings : Template List
Add, delete and edit templates that can be selected in the Detail mode of Workout. If you want to change the sort order, please long press → drag and drop. In addition, it is possible to add it from the button at the bottom of the usual training record edit screen only if it is added.
Workout / User Data Settings
The additional user data is the item name like “USER DATA 1” as it is, but you can change this as you like.
Swim Meet Settings : Show additional info [default : OFF}
Select whether to display the three “USER DATA” at the bottom of each swim meet record entry screen at the time of list view. When ON, three additional user data are listed.
Swim Meet Settings : Show swim meet type in list view [default : OFF}
Select whether to display the classification of the swim meet (short / long / OWS) in list view. When ON, the classification is displayed on the left.
Swim Meet Settings : Show photo in list view [default : OFF]
You can now register photos in swim meet records from Ver.4. Turn this on if you want to display this in list view. If you have a record without photos, the default image is displayed.
Swim Meet / User Data Settings
The additional user data is the item name like “USER DATA 1” as it is, but you can change this as you like.
Swim Meet / Detail / User Data Settings
There is additional data for detailed records as well. You can change the name of the item as you like.
Statistics Settings : Show workout counter [default : ON]
When the switch is turned ON, the workout record count information is displayed on the “Statistics” tab view. In the case of multiple swimmer / team mode, the information of the selected swimmer / team is displayed.
Statistics Settings : Show workout chart [default : ON]
When the switch is turned on, a graph of workout record is displayed on the “Statistics” tab view. If the number of records is small, it will not be displayed even if this is turned on. Also, if there are no records for multiple months or multiple years, monthly and yearly graphs will not be displayed. In the case of multi swimmer / team mode, the information of the selected swimmer / team is displayed.
Statistics Settings : Show weight chart [default : ON]
When the switch is turned on, a transition graph of weight set in the workout record is displayed on the “Statistics” tab view. This feature is disabled when a team is selected.
Statistics Settings : Show best time chart [default : ON]
When the switch is turned on, the “Statistics” tab view will display the best time list by event (by category) in the swim meet record. This feature is disabled when a team is selected.
Where am I? Settings : Route List (Add / Delete / Re-order)
Add, delete, edit the route of Where am I? Function. If you want to change the sort order, please long press => drag and drop.
Sharing Settings : Twitter
Select the item to be set when sharing workout on Twitter. Outputs items that are turned on. The title / footer is the word set at the top / bottom of the tweet.
Sharing Settings : Mail / Clipboard
Select items to be set when copying training records to mail or clipboard. Outputs items that are turned on. The title / footer is the word set at the top / bottom.
Export to CSV
Only this item is a feature, not a setting. Export workout records or swim meet records to a CSV file via email. Please refer to the CSV file header for the contents of the CSV file. This function is intended to be output and processed in Excel etc. and can not be used for backup use (there is no import function). Note that this feature is only available after purchasing an add-on.
APP Update Information
Migration from version 3.x
- Swim Note Ver.4.x is completely different from Ver.3, but all data should be migrated.
- If you update from a version older than Ver 3.1, the record will be destroyed (there will be no one using a version older than 3 years, and I can not support it, so please give up old data).
- Because of multiple swimmers / team management, all migrated recording data will be the swimmer data “Swimmer 1”. If you use this app alone, you do not have to worry about anything.
Ver 4.0.x what’s new
- You can now manage multiple swimmers (up to 5 people). Along with that, it became possible to manage as a team (up to 5 teams. 1 team up to 5 people).
- The tab items at the bottom of the screen can be changed (Activity screen / Workout + Swim Meet / only one or the other)
- Calendar display tab has been added. View Workout / Swim Meet and add new ones
- Able to register photo in workout record, swim meet record
- It is possible to set “name” for workout (Please turn on “Set name of each workout”)
- Added “Pool length * Lap” to the workout record input method
- In addition to conventional items (interval training and rest), “Time Trial” can be entered as an item of workout record. Only this can be registered up to 1/100 second.
- The classification (Short / Long / OWS) is enabled to be displayed when the swim meet list is displayed (Please turn on the setting “Show swim meet type in list”)
Ver 4.0.x changed / deprecation
- Changed the training record input method (Detail / Simple / Pool length * Laps) to the pull-down selection at the top of the screen
- Changed the selection method of swimming style and distance at workout input view from the button to the pull-down, and eliminated the item number restriction
- Changed item replacement operation such as workout detail to drag and drop (long press and move)
- The graph is displayed at the top of the workout tab. Tap on the graph to scroll to the record
- As 1/100 second in the swim meet record was described as milliseconds, it was corrected. If the swim meet type is Short or Long, for example, if 28 seconds 5 is entered, it will be treated as 28 seconds 05. Enter 28 seconds 50 if you only want to measure up to 1/10 second. On the other hand, if the swim meet type is OWS, it is treated as 1/10 second
- The badge display function (red circled numbers on the app icon) indicating the remaining days until the swim meet has been abolished
- The method of using a calendar for date specification has been discontinued