Add features to ROADSTOCK or remove restrictions.
Basic functionality will remain free as before; this applies only to additional features.
Contents
- 1 Features
- 2 Feature Description
- 2.1 Ad Removal
- 2.2 Touring Folder
- 2.3 Logging Resumption Reminder
- 2.4 All Vehicles Touring List
- 2.5 Removal of Vehicle Limit
- 2.6 Batch Import Touring Photos (Ver 2.1.0~)
- 2.7 Maintenance Reminder (Ver 2.2.0~)
- 2.8 Total Expense Summary by Vehicle (Ver 2.7.0~)
- 2.9 Batch Editing of Touring STOP Events (Ver 2.7.0~)
- 2.10 Bulk Editing for Maintenance and Expenses (Ver 2.7.0~)
- 2.11 Batch Deletion of Multiple Photos per Vehicle or Tour (Ver 2.11.0~)
- 2.12 Enhanced Touring Log Statistics Screen (Ver 2.17.0~)
- 2.13 Ability to individually enable/disable event icons on the map (Ver 2.18.0~)
- 2.14 Added Screen Capture Feature for Touring Logs (Ver 2.18.0~)
- 3 About Purchasing and Paying for Subscriptions
Features
The following features will be added.
- Ad Removal
- Touring Folder
- Logging Resumption Reminder
- All Vehicles Touring List
- Vehicle Limit Removal
- Batch Import Touring Photos (Ver 2.1.0~)
- Maintenance Reminder (Ver 2.2.0~)
- Total Expense Summary per Vehicle (Ver 2.7.0~)
- Batch editing of touring STOP events (Ver 2.7.0~)
- Batch editing of maintenance and expenses (Ver 2.7.0~)
- Batch deletion of multiple photos per vehicle or touring trip (Ver 2.11.0~)
- Enhanced Touring Record Statistics Screen (Ver 2.17.0~)
- Individual Setting to Show/Hide Event Icons on Map (Ver 2.18.0~)
- Added screen capture feature for touring logs (Ver 2.18.0~)
Feature Description
Ad Removal
Exactly as it sounds. Ads will no longer be displayed.
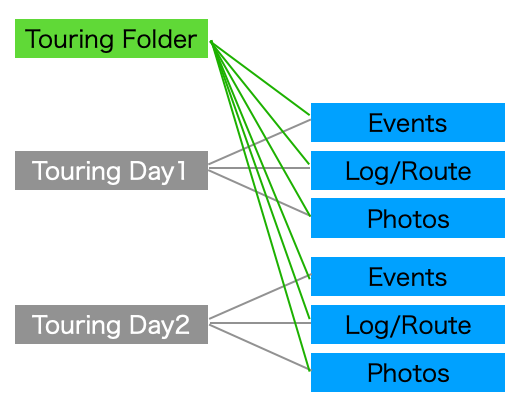
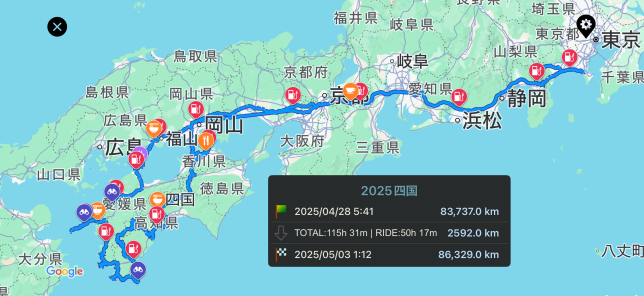
Touring Folder
This feature consolidates multiple touring logs into one. For example, if you recorded separate logs for Day 1, Day 2, Day 3, etc., during a long touring trip, it will merge these logs together.
Once grouped into a Touring Folder, opening that folder displays the logs from all included tours connected in chronological order. Photos, expense items, etc., are all displayed together. Summary metrics like time, distance, and fuel efficiency use the combined values.
The Touring folder merely consolidates the data; the original data remains unchanged and is preserved. Editing an event within the Touring folder will appear to update both the event within the Touring folder and the event in the original touring log (though it is actually editing the same data). Adding or deleting photos works the same way.
The data structure is illustrated in the diagram below.
How to Use
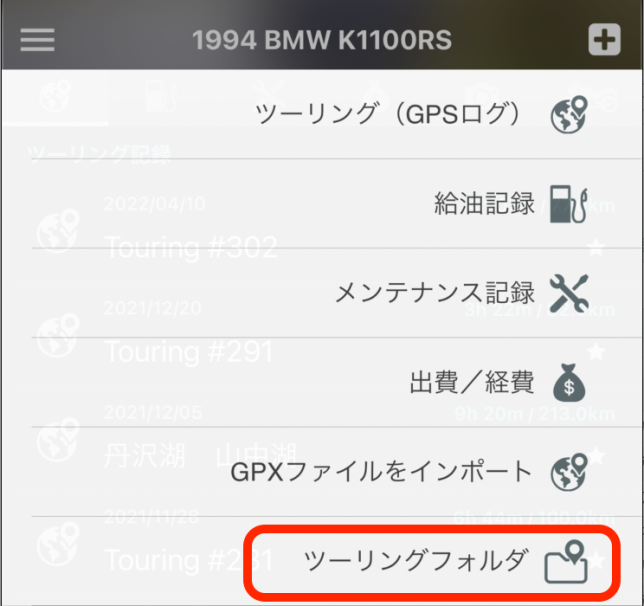
Select “Touring Folder” from the “+” menu in the upper right corner to instruct the app to retrieve touring logs.
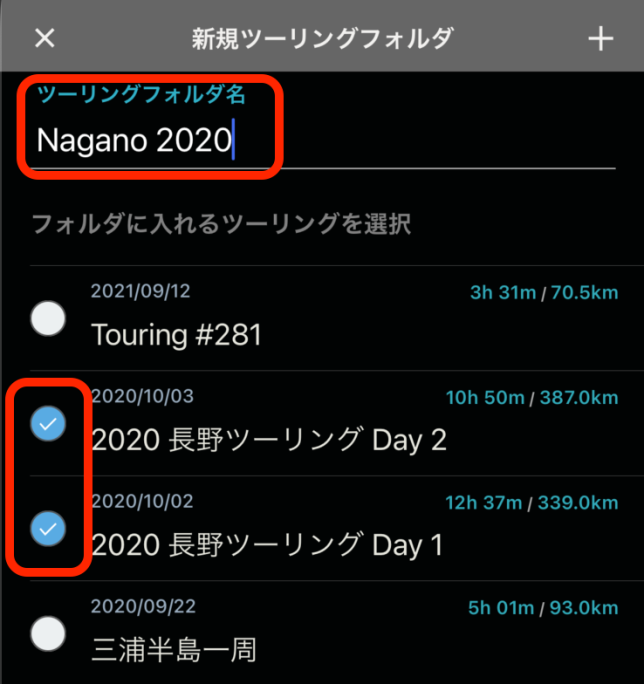
Enter the touring folder name, check the tours you want to add to the folder, then tap the “+” in the upper right corner.
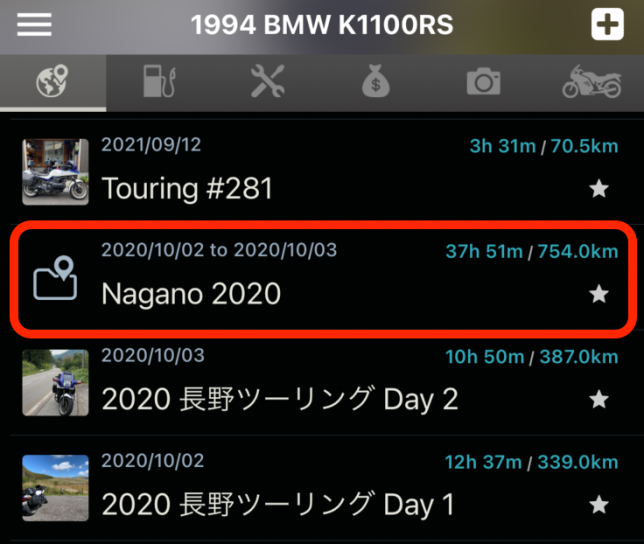
A new Touring Folder will be added just above one of the last touring logs in the folder. Tapping this will open the Touring folder. Aside from displaying the original individual touring log titles, it looks almost identical to the regular touring log screen, but it does not include the functionality to add photos or other items. Please perform those actions on the original touring log.
Important Notes
There is no function to add or remove tours from the Touring folder. Please delete the Touring folder itself and recreate it.
If you cancel your subscription after adding a Touring folder, the folder will no longer be displayed. However, the data will not be deleted and will remain stored. It will simply no longer appear on the screen.
Logging Resumption Reminder
I imagine quite a few people have had the unfortunate experience of starting a ride after “pausing” logging without “resuming” it, resulting in lost logs. I myself, as the developer, have been there.
It’s not just pausing—I’ve also repeatedly failed to “start” the next day’s ride when retrieving logging data by the day for long touring trips involving overnight stays.
As a countermeasure, I’ve added the ability to instruct the app to issue a reminder (notification) when pausing or ending logging. When instructing this, please specify the date and time directly. I considered setting it to “xx hours later,” but assumed it would be cumbersome to figure out how many hours “tomorrow at 6 AM” would be, so I opted for the direct date/time specification method.
It is not impossible for the logging itself to resume automatically at a set time without a notification. However, this would require the app to run continuously in the background, necessitating GPS to remain on for that purpose. Since pausing or stopping the app aims to turn GPS off, turning it back on would defeat the purpose. Therefore, we will not implement an automatic resume feature and will limit it to notifications.
How to Use
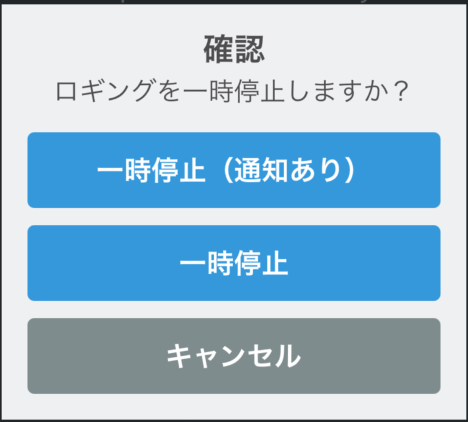
Note: While explained using “Pause,” the “End” operation is essentially the same.
The screen that appears when you press the Pause button now includes an option labeled “Pause (with notifications).” Tap this option. Tapping the “Pause” button below will perform the standard operation.
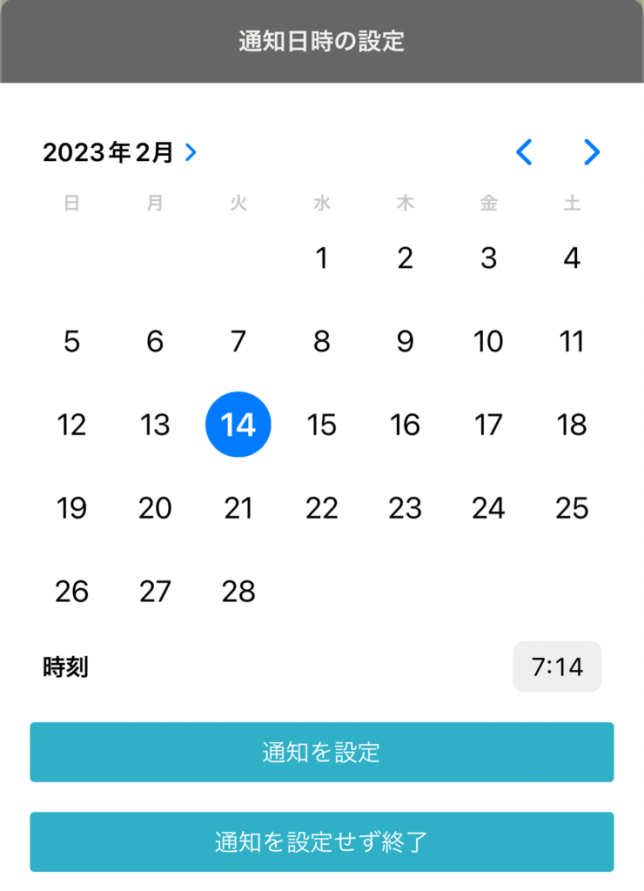
On the next screen, select the date and time, then tap “Set Notification.”
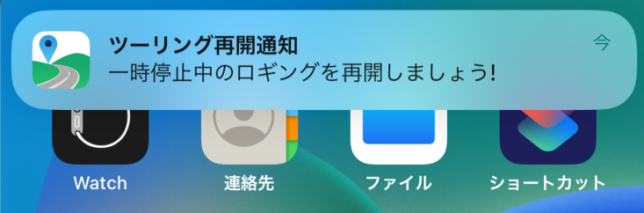
At the set time, a notification like this will appear. It is merely a notification; whether you actually “resume” or “start” is entirely up to you.
Version 2.10 adds the following features. All can be accessed from the Tools menu at the bottom of the app settings screen. Editing and registering new notifications use the same menu (it automatically determines whether to edit or register based on whether existing notifications exist).
- Function to edit the date and time of notifications set at the end of a tour
- Function to register notifications at any desired time, not just at the end of a tour
- Function to delete registered notifications
All Vehicles Touring List
I created this because I sometimes want to view the touring logs for multiple vehicles I manage all at once. The operation method is the same as “Favorite Touring”.
Removal of Vehicle Limit
The free version has a limit of 5 vehicles, but this limit will be removed.
Note that if you add more than 5 vehicles and then cancel your subscription, the limit will revert to 5 vehicles. However, your data will not be deleted and will remain intact. Only up to 5 vehicles will be displayed on the screen.
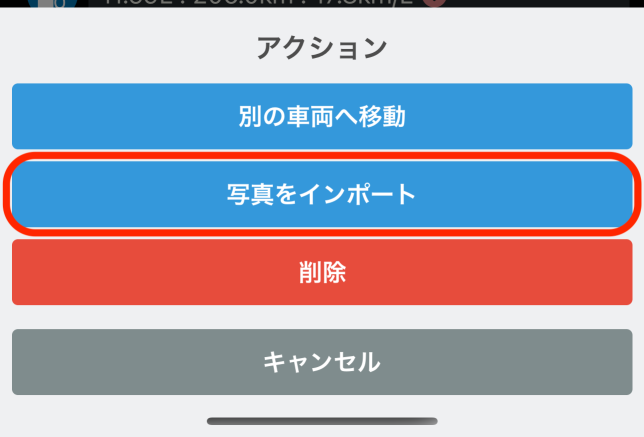
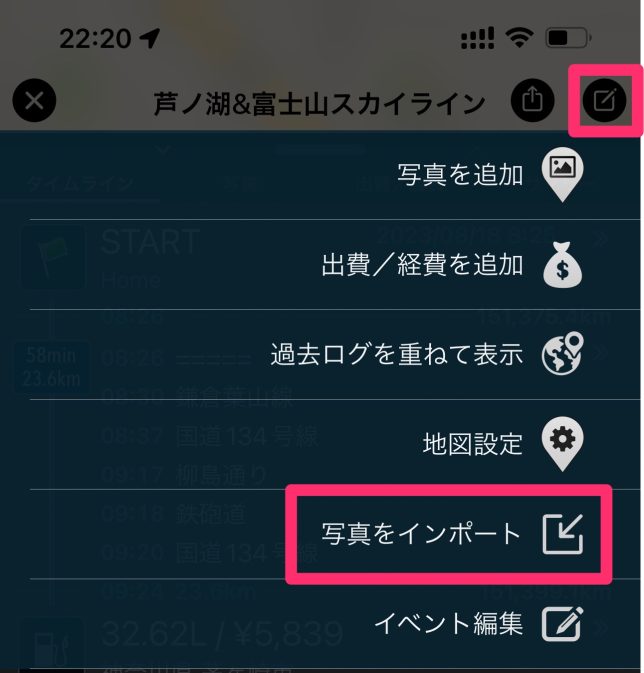
Batch Import Touring Photos (Ver 2.1.0~)
This feature batch imports photos taken within the start/end times of various events (START, STOP, GOAL, etc.) in your touring record and saved on your iPhone, registering them as photos for those events.
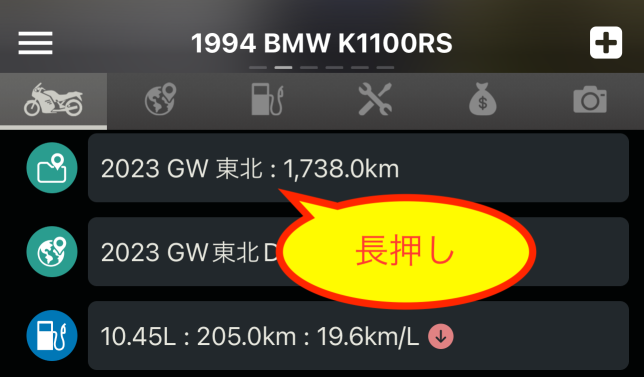
To use this feature, long-press a touring record in the Timeline tab or Touring List tab, then select “Import Photos” from the menu that appears.
This process matches the event times with the time stamps contained in the photos’ EXIF data. Therefore, photos taken outside of events will not be imported. For example, if you quickly snap a photo without dismounting your bike and immediately continue moving, no “STOP” event will be created, and consequently, the photo won’t be imported. While there is a way to import photos as road photos, the processing time would be enormous, so we currently have no plans to implement this.
Using this feature for bulk import often results in unnecessary photos being imported as well. Since deleting them individually per event is cumbersome, we have separately provided a feature to select and delete multiple photos at once per tour or per vehicle (available in Ver. 2.11.x and later).
↓
Starting with Ver2.7.x, you can now also execute it from the menu within the button in the upper-right corner of the completed tour screen.
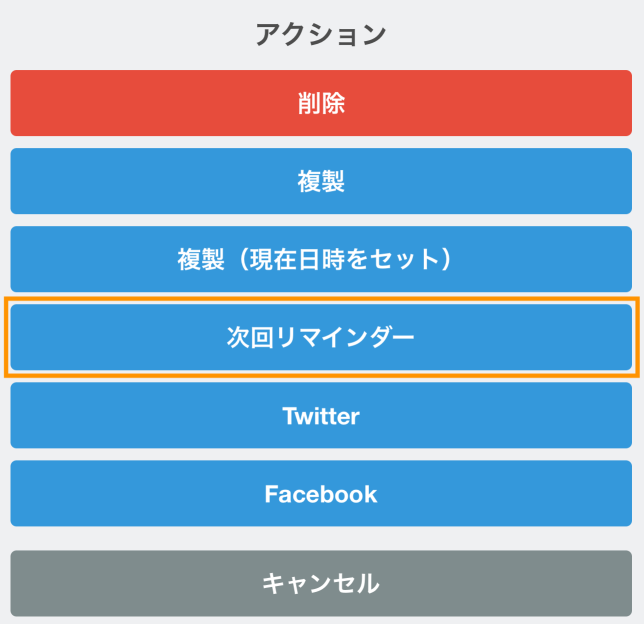
Maintenance Reminder (Ver 2.2.0~)
For registered maintenance records (e.g., “Engine Oil Change”), you can set a reminder for the next scheduled task based on distance or date (or both). Long-press the maintenance item in the Timeline tab or Maintenance Records tab, then select “Next Reminder” from the displayed menu. A screen will appear where you can specify the date and ODO.
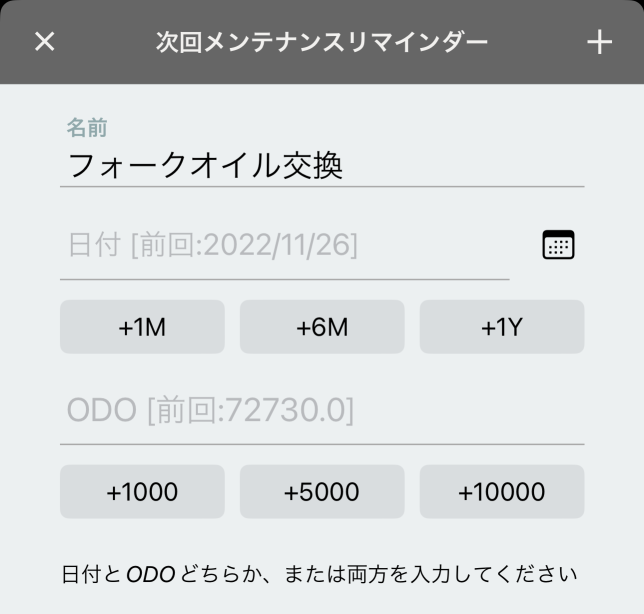
Set either one (or both) here, then tap the “+” button in the upper right to register.
You can view your set reminder items under “Reminders” in the app menu.
If the set date or ODO is exceeded, a red badge will appear on the menu icon in the upper left.

The number of items will be displayed to the right of “Reminders” in the app menu.

When you open the reminder screen, overdue items will be displayed in red text.
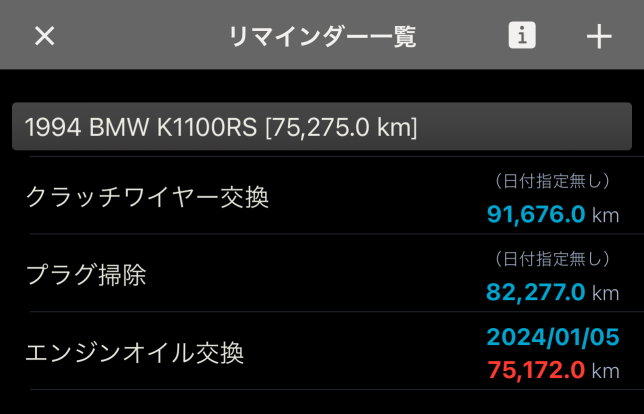
Additionally, you can set reminders for maintenance items that have never been performed from scratch using the + button in the upper-right corner of the “Reminders” screen. For items that have already been performed, we do not recommend setting reminders from here as it increases the number of steps required.
In Ver 2.10, we added fields for the last execution date and the ODO at the time of the last execution to the bottom of the reminder details screen.
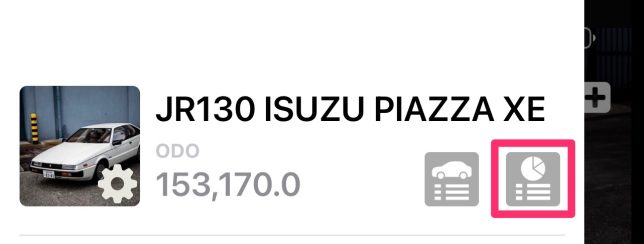
Total Expense Summary by Vehicle (Ver 2.7.0~)
This feature calculates the subtotals and grand totals for each vehicle’s “Touring,” “Fuel,” “Maintenance,” and “Expenses/Costs.”
Launch it from the following button in the menu accessed via the button in the top-left corner of the main screen.
Subtotals and total amounts for each category are displayed under the headings “Touring,” “Refueling,” “Maintenance,” and “Expenses/Costs.”
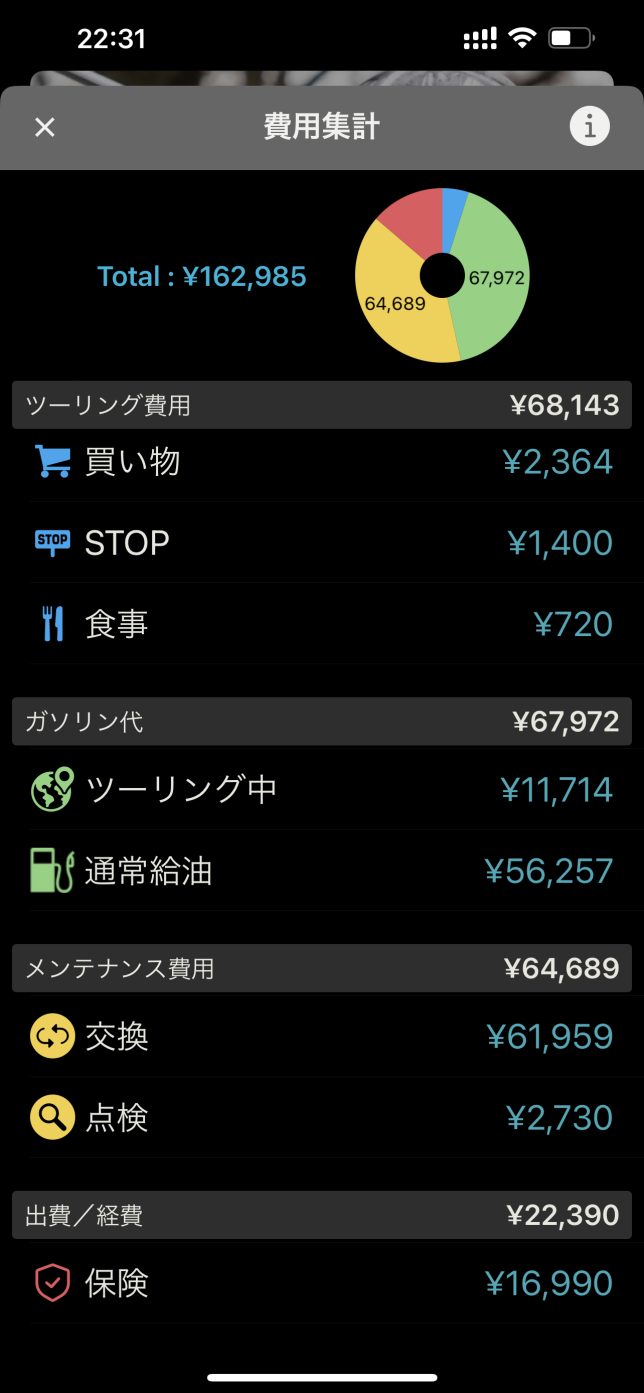
Please note that due to the nature of this app, fueling and maintenance events occurring during a tour are linked to the data in the Fueling Log List and Maintenance Log List. Simply aggregating these would result in double counting. Therefore, the following measures have been implemented:
- Refueling records/maintenance records that appear in both lists are included in the subtotal for the touring record.
- For the Total amount displayed at the top of the screen and in the graph, they are excluded from the touring record’s total amount.
Batch Editing of Touring STOP Events (Ver 2.7.0~)
When a touring session ends, numerous “STOP” events should be registered within the touring log (unless you didn’t stop at all). This feature was created to avoid the hassle of opening and configuring each one individually.
Open the completed touring session, then start by selecting “Edit Events” from the menu displayed via the button in the top-right corner of the screen.
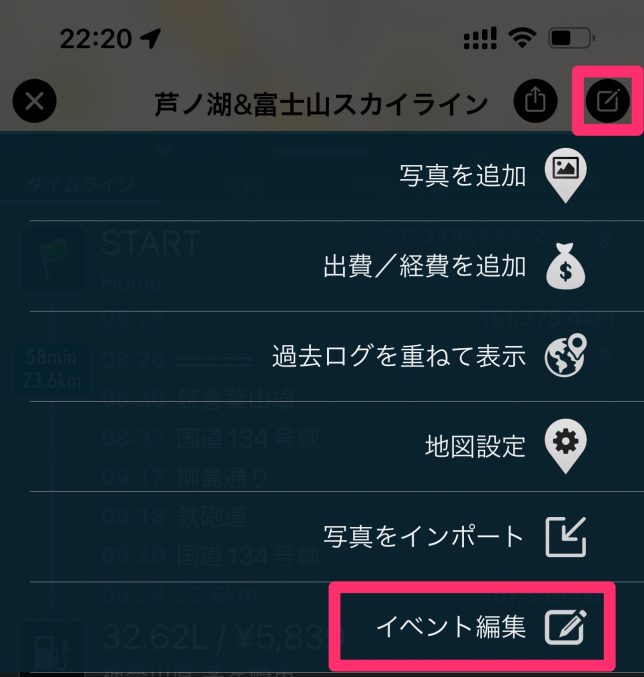
This screen will open.
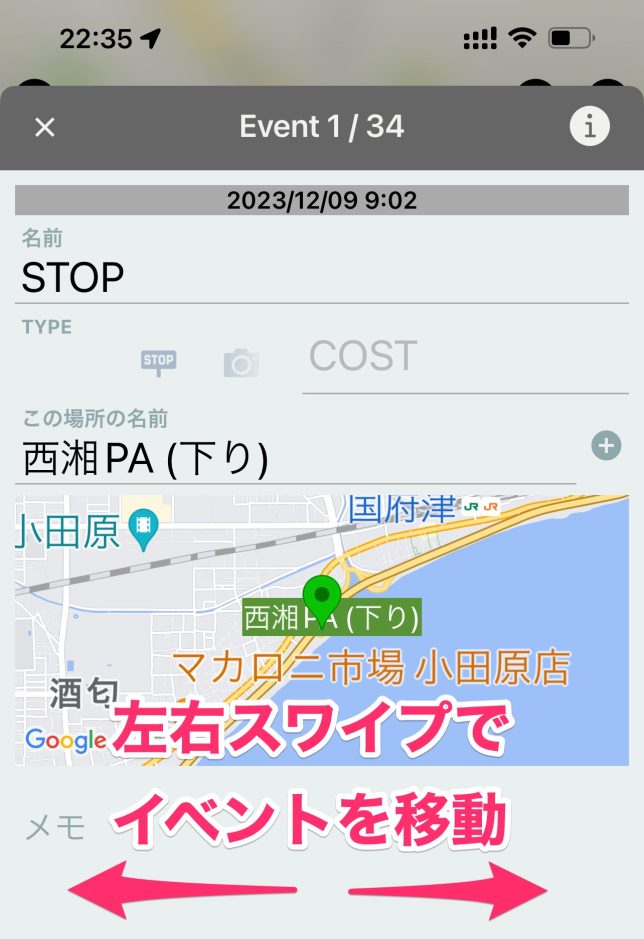
On this screen, you can enter or modify the “Name,” “TYPE (icon),” “COST,” “Location Name,” and “MEMO” Changes are saved as soon as you enter or select them. To move to editing the previous or next STOP event, swipe left or right on the screen.
Bulk Editing for Maintenance and Expenses (Ver 2.7.0~)
The “Tools” section within the app settings menu contains the following two options. Both are designed for scenarios where you need to quickly change names or reclassify items for any reason. We added this bulk editing feature because enhanced aggregation functions make it convenient.
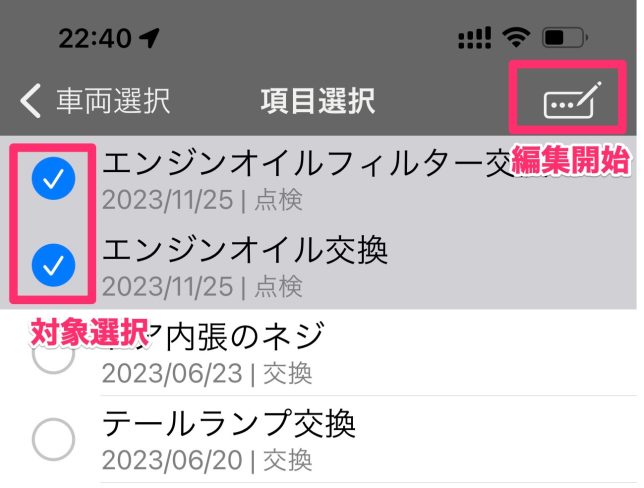
- Batch Edit (Maintenance): Batch update selected items (Name/Category/Amount/Notes) across all maintenance data.
- Batch Edit (Expenses): Batch update selected items (Name/Category/Amount/Notes) across all expense data.
Select a vehicle → Select target data → Press the button in the upper right corner to enter the edit screen.
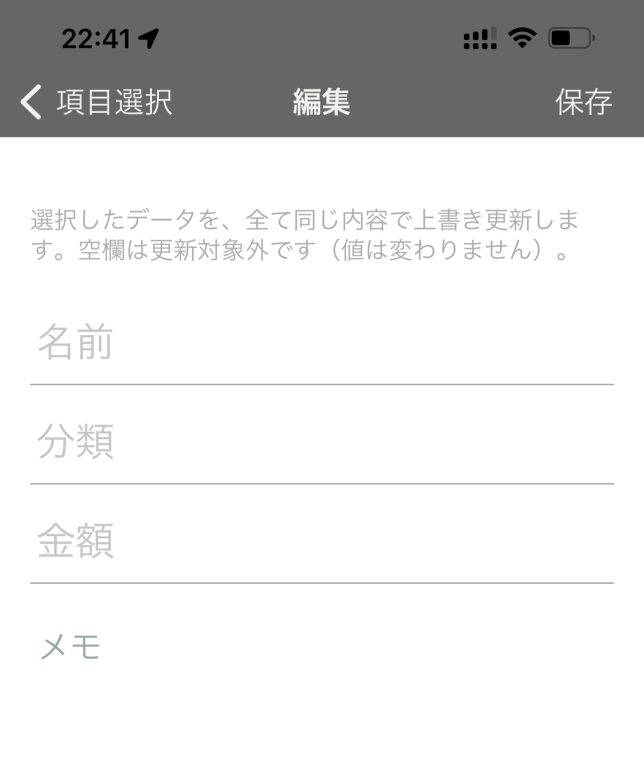
Enter only the sections you wish to update in bulk, then click the “Save” button. Sections left blank will not be updated.
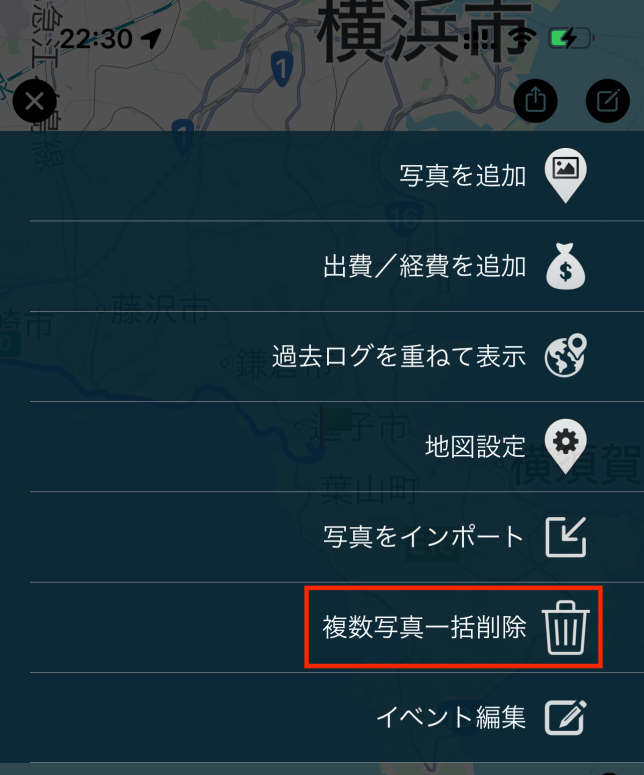
Batch Deletion of Multiple Photos per Vehicle or Tour (Ver 2.11.0~)
You can delete multiple photos at once per vehicle or per tour.
Per Vehicle
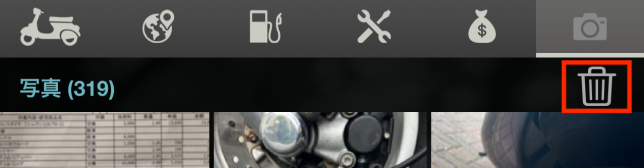
Tap the trash can icon in the upper right corner of the Photos tab on the main screen to display the deletion screen. Select the photos to delete and then execute the deletion.
Alternatively, you can launch the same screen from “Batch Delete Multiple Photos” in the Tools section of the app settings.
The mode at the top of this screen switches between photo selection mode and photo display mode.

The default mode is Photo Selection Mode (where you can select items for deletion). Tapping a photo in this state selects it. To view a photo, switch to Photo Display Mode and tap the photo. This will not select it but will enlarge the photo for viewing. If you wish to delete it after viewing, switch back to Photo Selection Mode and select it.
Touring Unit
Open the menu in the upper-right corner of the touring record screen. Near the bottom, you’ll find the “Batch Delete Multiple Photos” menu. Selecting this displays a batch deletion screen for all images associated with the touring event. Select the photos you wish to delete before executing the deletion.
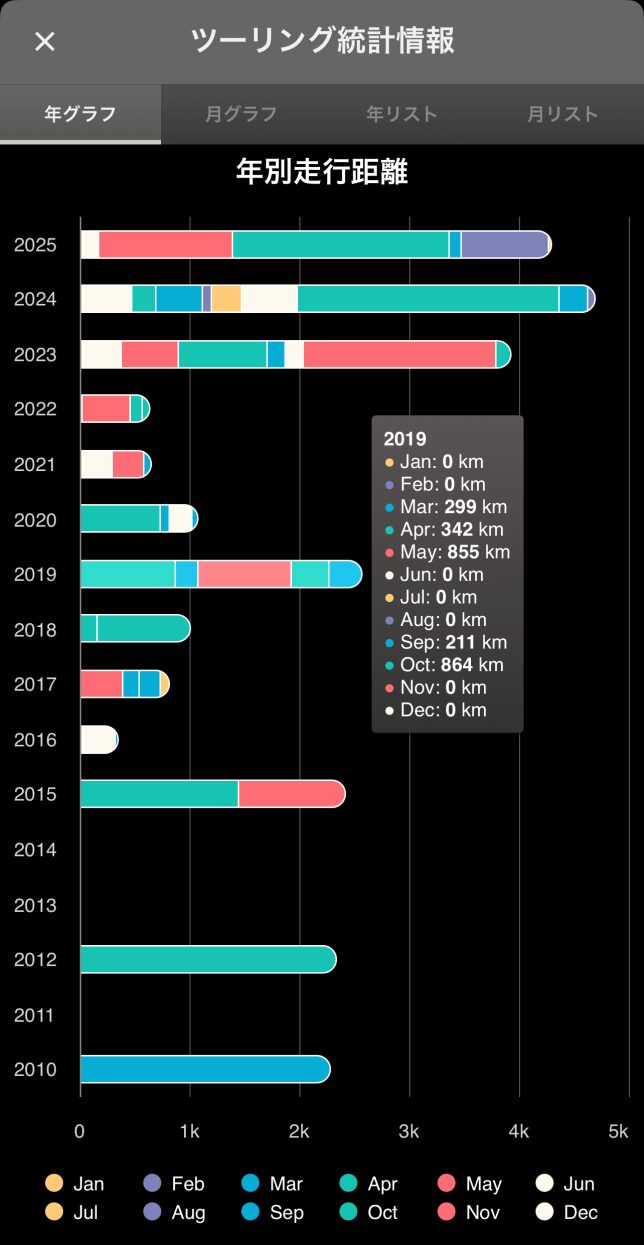
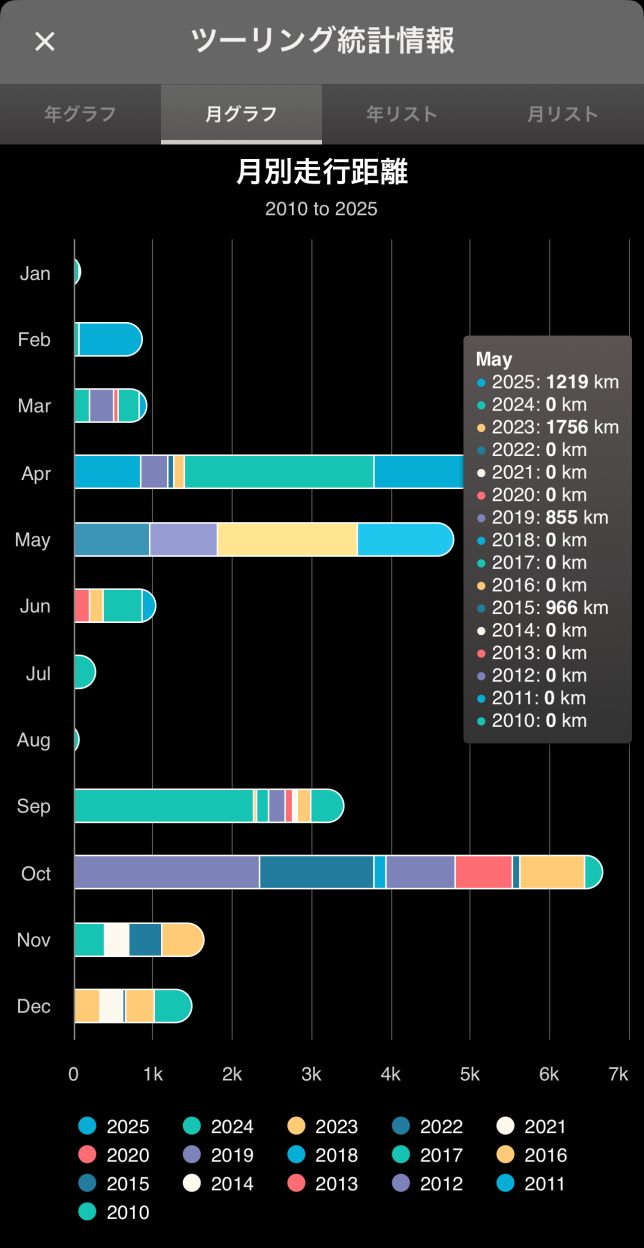
Enhanced Touring Log Statistics Screen (Ver 2.17.0~)
Previously displayed as a simple list, we’ve now added graph visualization. It shows annual and monthly mileage as vertically stacked bar graphs.
Access it via the graph button at the far right of the Touring Log tab.
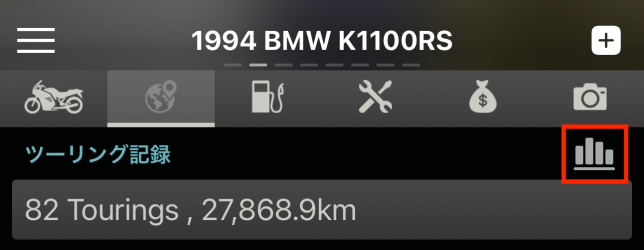
Yearly and monthly graphs have been added. Tapping within the graph displays detailed information for the year or month.
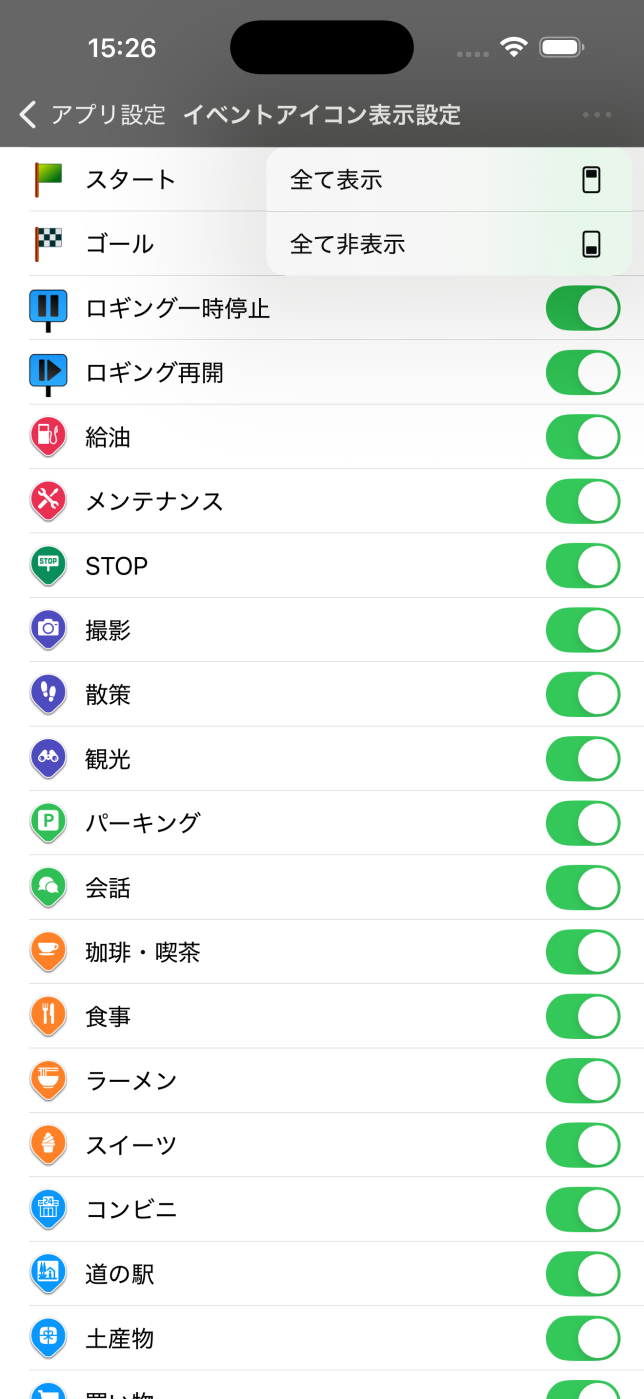
Ability to individually enable/disable event icons on the map (Ver 2.18.0~)
While icons corresponding to various event types during touring are displayed on the map, this feature allows you to enable or disable these icons individually for each icon type.
There are two ways to access this setting:
- Open the app settings screen → Tap “Select the icons type to display” in the “Map Settings” section
- Open the ADD/EDIT MENU in the upper-right corner of the Touring Results screen → Tap “Map Marker Settings” → Tap “Select the icons type to display” in the “Map Settings” section
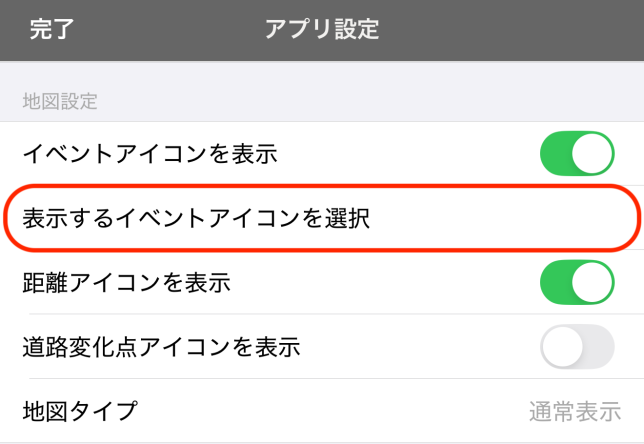
On the displayed screen, toggle the switch on the right to ON/OFF and specify the icon type to display or not display.
![]()
Sometimes you might only want to see this and that, and nothing else. For that purpose, you can also use the menu in the upper-right corner of this screen to select “Show All” or “Hide All.”
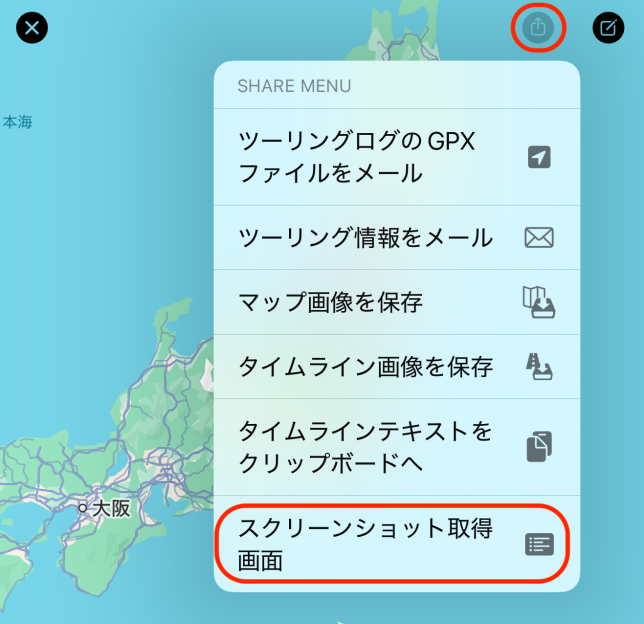
Added Screen Capture Feature for Touring Logs (Ver 2.18.0~)
Looking at posts on social media from ROADSTOCK users, many seem to be using screenshots from the “Summary” tab for touring. While that’s perfectly fine, from the perspective of creating images for posting, I noticed some issues (though not major ones): there’s a lot of wasted display space (especially in landscape mode), and you have to go out of your way to mask the maximum speed. That’s why I created this screen.
We focused on two key points: “Displaying the map plus only the essential information” and “Placing that ‘essential information’ in the optimal locations on the screen.” Additionally, to prevent icons from becoming unnecessarily crowded, we added the icon display settings feature mentioned above.
To access this screen, tap “Screenshot Capture Screen” from the “SHARE MENU” (the second icon from the right in the top-right corner) on the Touring Results screen.
Immediately after startup, it looks like this. Depending on your settings, the map icons display “only the essential information” in the lower center.
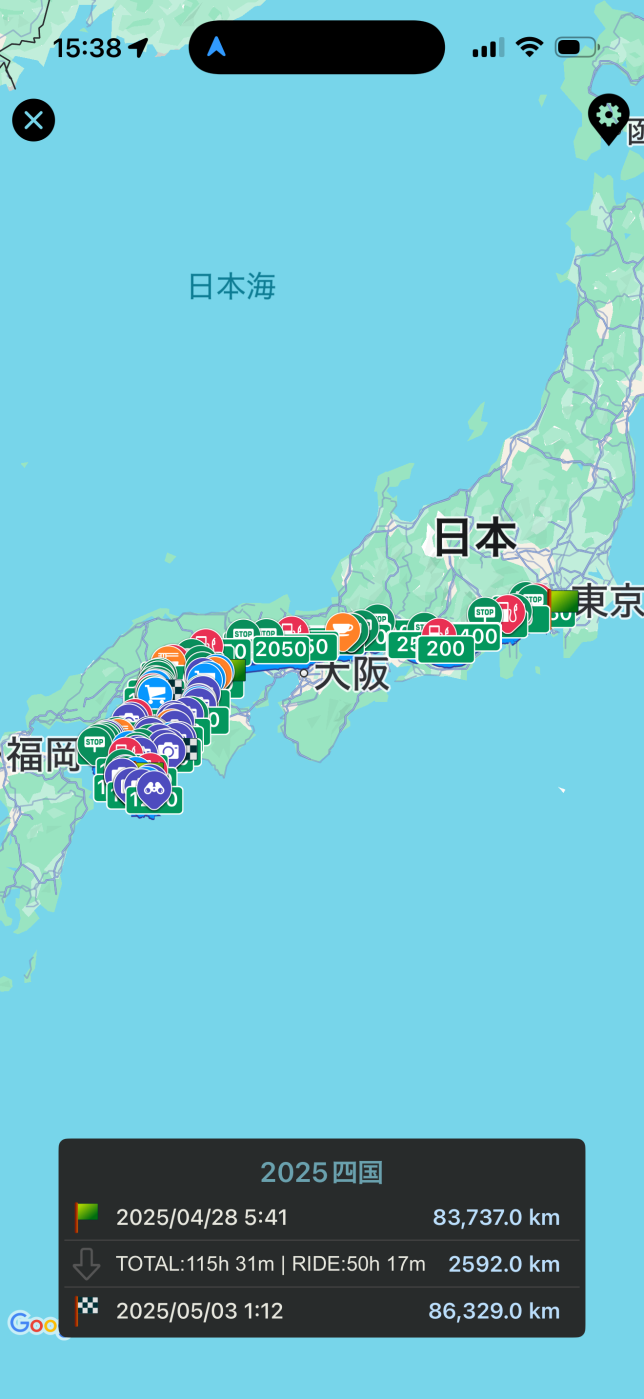
Select the icon to display, hide the distance, rotate it horizontally, then drag the gray frame labeled “Minimum Required Information” to reposition it. The result will appear as follows. Take a screenshot in this state and use it as needed.
About Purchasing and Paying for Subscriptions
All procedures follow Apple’s App Store guidelines.
Subscription Types and Pricing
As of February 2023, we offer two types: monthly and yearly. Prices are subject to change without notice. Please refer to the Add-on Subscription page within the app for current pricing.
Subscription Renewal
Subscriptions renew automatically. To stop renewal, cancel your subscription.
Checking and Canceling Your Subscription
Please manage this through your App Store account settings.
For details, refer to Apple’s explanation.
Please note that deleting the ROADSTOCK app does not cancel your subscription.
Other Important Notes
- This subscription adds the features listed above and does not provide any additional support beyond that.
- Cancellation is not possible outside of the App Store.
- We cannot answer questions regarding payments or App Store functionality. Even if you contact us, we will be unable to resolve such issues.